- Home
- Classical Fingerstyle Portal
- 15 Actionable Guitar Lessons
- Classical Guitar Technique
- Guitar Lessons
- Beginner Lessons
- Guitar History
- The Renaissance Guitar
- Guitar Time Line
- Classical Guitar Blog
- Contact
- About Author
- Site Search
- Privacy Policy
- Site Map
- Classical Guitar Study Course 3.0
- Instant Classical Guitar Repertoire
- Classical Guitar Lessons For Beginners
Classical Guitar Technique:
How To Improve It Using 9 Actionable Steps in Only 21 Days! (2023 Update)
The Definitive Guide to Developing Your Classical Guitar Technique Foundations...
Classical Guitar Technique foundations are today's topic of discussion. Namely, I’m going to show you how I improved my own guitar technique and that of my students in just 21 days.
And I was able to do this despite starting VERY late in life in playing guitar. Indeed, I was 24-years-old when I first started studying how to play the classical guitar!
The best part?
My sound, tone and overall classical guitar technique, and that of my students, improved out of sight! And it will be the same for you too!
But you're probably wondering:
How did I achieve this in near record time?
With my Techniques and Methods such as the ‘Sydney Harbour Bridge Method’, the ‘Tightrope Walker Technique’ and the ‘String Squeeze Method’ to name just three.
Warning: These techniques SHOULD be mastered BEFORE you try to learn, or re-learn more advanced, or even intermediate skills such as arpeggios and classical guitar tremolo.
Let’s get started:
Use These 9 Techniques and Methods to Improve Your Sound and Tone Out of Sight!
(Every Classical Guitarist Needs to do this!)
Here are the nine techniques and methods you should use if you want to immediately improve the tone, sound and CONTROL of your classical guitar technique and performance skills...
Don't Just Get a Head Start - Get a FAST START!
One of the biggest challenges in learning to play classical guitar is to know where to start.
That's why I created the ‘Classical/Finger Style Guitar Lessons Portal’ which helps you to make a fast and logical start. You can join here...
https://www.learnclassicalguitar.com/Classical-Guitar-Fingerstyle-Portal
Oh, and did I mention - it’s FREE? 😊
Just
follow these 3 easy steps...
1. Enroll in the Classical-fingerstyle Lesson Portal here...
https://www.learnclassicalguitar.com/Classical-Guitar-Fingerstyle-Portal
2. Select the lessons you want to practice
3. Start making progress on the classical guitar
If you're really serious about learning classical guitar, you can also download your copy of...
"Ten Important Skills You Need as a Classical Guitarist" (inside the portal).
P.S. If you resonated with this idea I think you're going to love how the portal gives you an advantage and a fast start in playing classical guitar. You can join in literally seconds here...
https://www.learnclassicalguitar.com/Classical-Guitar-Fingerstyle-Portal
So very often I see on different classical guitar websites,
run by very good players and teachers, jumping to more advanced techniques
without making sure that the foundation techniques (above) are mastered
first.
These techniques and methods will help you to get a better mental picture of what you should be doing AND, because we mostly think in pictures or icons, will help you remember the important information much more easily!
The first 5 of these methods are what you need to do to PREPARE yourself to create a great tone, beautiful sound, and secure classical guitar technique.
But even before THAT, if you use a foot stool you adjust it so that it is about the height of your hand from your wrist to the tip of your middle finger.
Why?
Because it will raise your leg to the right height in preparation for these first 5 steps. Your raised knee should roughly be just above the level of your hip so that the guitar doesn’t slip off your leg when you’re playing.
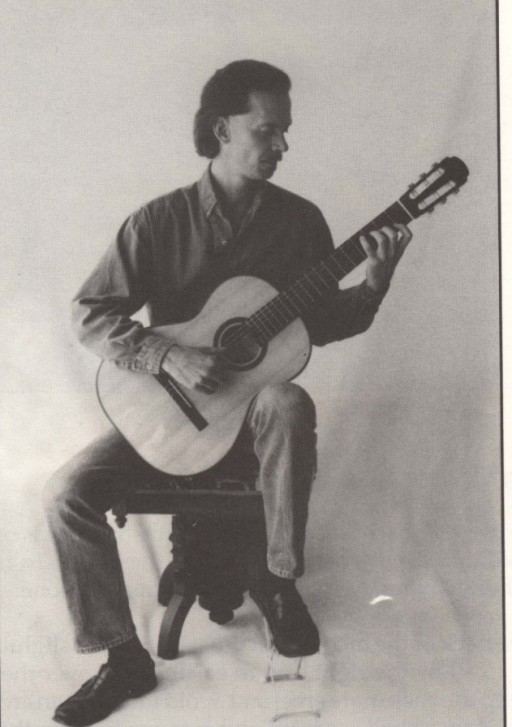 Classical Guitar - Raised Knee Sitting Position
Picture courtesy of Anthony Glise in Classical Guitar Pedagogy...
It Was a Great Day: 6 out of 7 Students
Achieved an
‘A’ or ‘A+’ Result (An 85% Strike Rate!)
When I first started using these techniques and methods with my students a HUGE percentage of them improved dramatically in terms of their overall sound, tone color and classical guitar technique.
I remember one year I had 7 students sitting practical classical guitar examinations at the Sydney Conservatory of Music, from beginner to Grade 4.
I also remember being on such a high for them when, at the end of the day, 6 of the 7 students had received an ‘A’ or ‘A+’ grading with 2 students actually receiving ‘Outstanding’.
ALL of them had gone through the initial process BEFORE they even played a note of learning these classical guitar techniques and making them second nature.
I believe it was what set them up for success!
Now I’m going to show YOU just what I showed my students to give them, and you, a very solid foundation for your classical guitar technique.
The Truth Will Set You Free!
You may not want to read this, but here we go…
If you have a crappy initial foundation approach towards technique, then you’re never going to produce a beautiful, crisp, clear tone on the classical guitar, or develop your classical guitar technique to any great depth.
Out of all the styles on guitar I think classical guitar technique is the one that you cannot ‘skimp on’ if you want the right sound.
What’s the bottom line here?
You’ll need to use the 9 techniques and methods I describe below to achieve the right sound and tone color.
Yes, you CAN learn it even if you’ve developed some bad habits. Bad habits can be broken quite fast though.
Indeed, it’s said you can break a bad habit and form a new (good) one in around 21 days, hence the time-frame in the original heading!
When I first became aware of this, it surprised me.
But I now know through experience, and teaching many, many students over the years, that YOU can do it too!
Let's do this!
1. The Belly Button Approach
When you pick up your guitar and sit down to play, the VERY FIRST thing you should think of is the ‘Belly Button Approach’. It’s the first ‘cab off the rank’ so to speak in terms of classical guitar technique.
What do I mean?
You place your guitar in such a position that you can reach all along the fret-board with your left hand and be able to move your right hand to pluck the strings and be able to slightly move your head to view what both hands are doing.
The Belly Button Approach and the Triangulation Technique are performed virtually simultaneously and go hand-in-hand with each other.
This is a 1 step process and is VERY easy!
The Belly Button Approach means you align the guitar with your body so that the 18th fret of the classical guitar is in line with your belly button...
(I hope you have one! ).
Feel That Excitement in Your Belly Button Yet?
The 18th fret is just about the last fret on the fingerboard where it meets the sound hole. See the picture below…
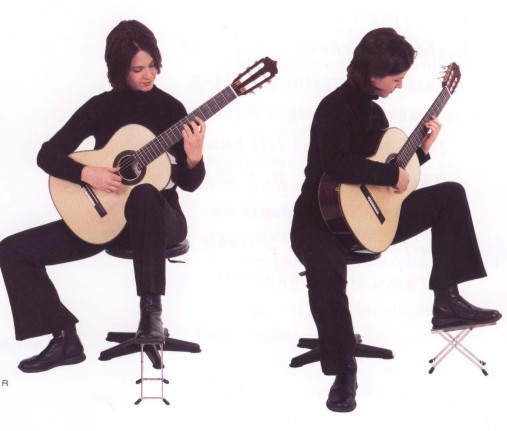 Classical Guitar - The Belly Button Approach
Picture courtesy of David Braid in Play Classical Guitar...
If you position the guitar this way, it’s like when a pianist sits down at the keyboard. It would be quite strange if the piano player sat at the far left or right on the piano stool, instead of in the middle of the keyboard (where middle C is).
Indeed, it would be hard to play most music in this position.
There would be an imbalance. It’s the same with the guitar and is the first step to a solid classical guitar technique.
If the 18th fret is aligned with your belly button, then the guitar is positioned in the middle of your body and your arms can reach easily either side to perform their tasks.
Now you’re ready for the Triangulation Technique!
2. The Triangulation Technique
Here’s the process:
When you sit down to play or practice you need to hold the guitar properly so that it is very securely sitting between your legs and positioned in an ideal way to comfortably play the music.
What do we call this particular type of classical guitar technique?
This is where the Triangulation Technique comes in.
As the name suggests, there are three points of contact for the guitar to make it secure in preparation for practice or performance.
Step 1:
There are three ‘points of contact’ of the guitar with your body...
Namely:
The ‘Waist’ of the guitar (between the Upper and Lower bouts) is resting on your left leg (presuming your right-handed, opposite for a ‘lefty’).
Step 2:
The base of the guitar rests against your inner right thigh.
Step 3:
The back of the guitar of the upper bout rests against your chest.
Which means?
Already, with these 3 simple steps, you have made the guitar very stable, which is an ideal place to be when you actually start playing music!
Stability Is the Key!
The stability comes from the three points of contact in the ‘Triangulation Technique’ and once you add ‘The Sydney Harbour Bridge Method’, a 4th point of stability with your right arm, it is virtually impossible for the guitar to move or slip. Now your classical guitar technique is really developing!
(We’ll come ‘The Sydney Harbour Bridge Method’ in a moment).
As you probably know, the triangle is one of the strongest shapes in buildings. That’s why you see triangles all the time in roofs and walls...
 Classical Guitar - The Triangulation Technique
As you can see in the photo above, even the wall has a triangle where the angled stud intersects with the horizontal studs.
The above steps are SO important in laying down the foundation of classical guitar technique, not only with children but adults too!
Say This Often: If It Is to Be, Then It’s Up to Me!
I remember so many times in my private teaching studio at home I would spend a large part of the first lesson with new students to make sure they could sit down and instinctively know where and how to place their guitar.
This meant they had optimal reach and comfortable positioning of their guitar which was naturally stable.
Bottom line?
I wouldn’t let the student progress until they could sit using the ‘Triangulation Technique’ BEFORE we moved on – it was THAT important!!!
You’d be surprised how easy this is to do, even for children, with a short bit of practice, even more so when the Sydney Harbour Bridge Method is applied.
But we’re getting ahead of ourselves…
Before ‘The Sydney Harbour Bridge Method’ we need to understand and practice ‘The Eye Level Method’...
3. The Eye-Level Method
So, what is the Eye-Level Method?
It is this:
When you have placed the guitar using The Belly Button Approach and The Triangulation Technique the next step is to achieve The Eye-Level Method.
This is also a VERY easy 1 step method, but it is important for overall balance and comfortableness when playing.
As the guitar is
sitting in your lap after the Triangulation Technique, arrange the head-stock of
the guitar (where the tuning pegs are) in line with your eye level. It looks
like this…
 Classical Guitar - The Eye-Level Method
You can see the angle of the guitar is now about 45 degrees to the floor and the head-stock is at your eye level. Perfect technique!
When the guitar is slightly tilted back onto your chest and is positioned to be in the center of your body (The Belly Button Approach) you are now ready to add a 4th point of contact for even more stability.
What is this 4th point of contact?
The Sydney Harbour Bridge Method!
4. The Sydney Harbour Bridge Method
Most people around the world know of two very famous Australian landmarks.
They are the Sydney Opera House...
 Sydney Opera House
And the Sydney Harbour Bridge...
 The Sydney Harbour Bridge
The Sydney Harbour Bridge was started in 1924 and was completed and opened in 1932 and, like many huge public works programs, had its difficulties and scandals...
 The Sydney Harbour Bridge being built
Indeed, at the ribbon cutting an idiosyncratic, outlandish, and political mal-content, named Francis De Groot, rushed forward on his horse and cut the ribbon before the Premier of N.S.W. at the time, Jack Lang, could cut it just to make a political point…
 De Groot
Luckily, there was a ‘Take-Two’ and the Premier finally got to declare the bridge open himself, joining both sides of the harbour and cutting down on the time it took to travel for the people of Sydney.
It was indeed, a marvellous achievement!
And all over the world people have since marvelled at the engineering that went into it and it is considered one of the most amazing engineering achievements the world has seen.
But we classical guitar players don’t really need to know the history of the bridge, although it is quite interesting.
We just need to be aware of its SHAPE!
Why?
The Shape is Everything!
Because, for the sake of proper guitar technique, the shape of the Sydney Harbour Bridge is the shape we need to make with our right arm when we place it on the ‘lower bout’ of guitar…
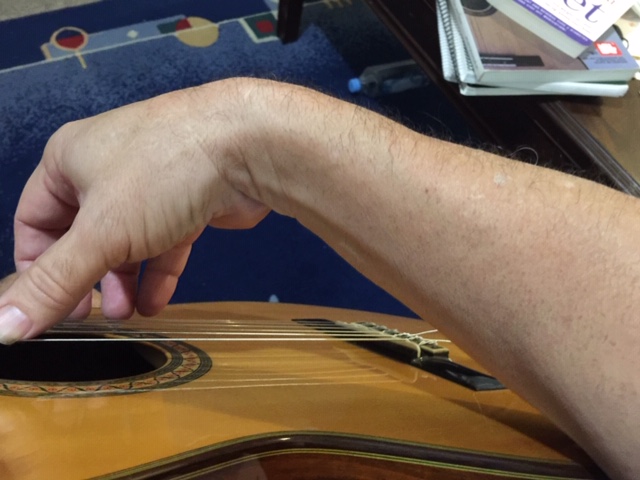 Classical Guitar - The Sydney Harbour Bridge Method
Even when our fingers are brought down to the strings your forearm maintains that Harbour Bridge shape (from the road up to the arch).
Why is this important?
Well, if you place your forearm too shallow in relation to the soundboard, or top of the guitar, you tend to pull the strings out from the soundboard when trying to play notes.
This causes the notes to make a horrible ‘thwacking’ noise and is definitely NOT in keeping with making the guitar sound ‘dolce’ or sweet, to say the least!
Definitely NOT good classical technique!
Indeed, you tend to lose a lot of control in your right hand when you place it too shallow in relation to the soundboard.
Keep the ‘Arch’- Don’t Let it Fall!
The shape of the ‘arch’ in your forearm is the PERFECT shape to make to have control over your right-hand technique, which includes depressing and deploying the strings TOWARDS your tummy BEFORE releasing them after playing notes.
But you're probably wondering:
Why is this important in terms of classical guitar technique?
As you’ll see in the upcoming ‘Tightrope Walker Technique’ it pays to have the right positioning for your right hand to achieve great technique and control, and ultimately, great tone color and sound!
This ‘secret’ is often not communicated to classical guitar students, namely: depressing the strings with your fingers towards the back of the guitar and your tummy.
This allows for a ‘purer’ sound AND allows you to control volume and tone color WAY more than you would if you position your hand with a shallow action.
DON’T UNDERESTIMATE THIS INFORMATION!
It’s too important to dismiss for your correct classical technique!
The ‘4th Point of Contact’…
Additionally, when ‘The Sydney Harbour Bridge Method’ is applied you now have a 4th point of contact to add to the ‘Triangulation Technique’ and that means even MORE stability in your guitar position…
Here’s the best part:
When we get to the ‘Hinged Thumb Method’ and the ‘Ballerina Technique’ the stability of positioning the guitar is complete and sets you up for creating a highly sound classical technique which leads to a wonderful overall sound...
 Classical Guitar - 4th Point of Contact
To summarize:
Step 1:
Place the inside of your forearm (close to the elbow joint) on the ‘upper bout’ of the guitar, in roughly the middle of the bout and in line with the ‘Bridge’. The Bridge is where the end of the strings are tied and secured.
Step 2:
Let your fingers come down and touch the strings resting your thumb on the lower ‘E’ string, your 1st finger on the ‘G’ string, your 2nd finger on the ‘B’ string and your 3rd finger on the thin treble ‘E’ string (closest to the floor).
Do this WITHOUT covering the sound hole. To allow the sound to come out into the room make sure your right thumb is aligned with the middle of the sound hole. Another tick in your correct classical guitar technique!
Step 3:
Make sure you MAINTAIN the Sydney Harbour Bridge arch from elbow to fingertips. Now you are ready for the ‘String Squeeze Method'!
5. The String Squeeze Method
Here’s how it works:
The String Squeeze Method is where the ‘rubber hits the road’ in terms of making your classical guitar technique 2nd nature without having to think about it.
It is also where you make a habit of moving the strings TOWARDS your tummy before releasing them.
In this way, you not only control volume variation but it makes your tone color ‘purer’, so to speak.
Playing the strings in this manner is one of the secrets to great tone and expressiveness but you need to make it 2nd nature!
How is this possible?
EVERYTHING we learn goes through the...
'4 Stages of Competence/Learning'
1. Unconscious Incompetence
2. Conscious Incompetence
3. Conscious Competence
4. Unconscious Competence
In Unconscious Incompetence, you aren’t even aware that a certain skill or knowledge gap exists for you.
In Conscious Incompetence, you become aware of a skill or knowledge gap and understand your desire or importance of acquiring your new skill. In this ‘state’ learning can begin.
In Conscious Competence, you know how to use the skill or perform a certain task, but it obviously requires practice, conscious awareness and, of course, hard work!
In Unconscious Competence, you have enough experience with a skill that you can perform it so easily you do it ‘unconsciously’.
Reference: https://en.wikipedia.org/wiki/Four_stages_of_competence
YEAH!!!
You have arrived!
Work on that Attitude!
Seriously, this is nothing new. We ALL go through these stages in EVERYTHING we learn. Including classical guitar technique!
Remember how hard it was to learn to drive a car, especially if it was a manual model with a gear stick shift?
I remember my driving instructor would make me do ‘Hill Starts’ on an enormous steep incline and when I first did it I would almost panic and lose control of the vehicle.
But, as I progressed through the ‘Four Stages of Learning’ it became easier and easier so that today, I could do that same hill start with my eyes closed – although I’m not that silly to actually do it with my eyes closed!
It’s the same with learning the skills of classical guitar technique.
Depending on the difficulty level of course, you can ‘tear’ through the 4 stages with ease, especially if you approach them confidently and enthusiastically.
Indeed, I think working on your attitude, enthusiasm, and especially being determined, you can pretty much glide through the ‘4 stages’ of most skills with ease. There’s ALWAYS a choice my friends!
Let’s examine the actual ‘String Squeeze Method’:
Here Are the Steps:
Step 1:
Place your thumb on the bottom ‘E’ string so both part of your flesh and the nail are touching the string. Then your ‘i’, ‘m’, and ‘a’ fingers are placed on the ‘G’, ‘B’ and treble ‘E’ strings.
Step 2:
Squeeze the strings so that they are ‘coming together’ i.e. the thumb pushes the ‘E’ string towards the ground.
At the same time the treble strings are pushed upwards and towards the bass ‘E’ string in the opposite direction.
Step 3:
Note: This step is done at the SAME time as Step 2!
As you’re squeezing the strings toward each other you’re also pushing them, as a group, slightly towards the back of the guitar and towards your tummy.
But DON’T let go just yet…
Step 4:
Once you have depressed the strings towards the back of the guitar about 4 or 5 millimetres release all the strings at the same time and allow them to return to their normal position (you’ve just played an open-string chord!).
Be sure to try to control your finger strength in this movement. Don’t overdo it or you’ll get that same ‘thwacking noise’ you get if your right arm plays too shallow.
With practice, you should be able to control the volume of this movement AND make it sound quite ‘legato’, or smooth and connected.
Take This Information Seriously and It Will Pay BIG Dividends in terms of your classical guitar technique!
This exercise, when learned through the ‘4 Stages’, will allow you to control both the volume of your playing AND the tone color so that it is smooth and in a ‘dolce’, or ‘sweet’ manner.
Bottom line?
Your overall classical guitar technique has now ‘gone up a peg or two’, which is the aim of the game really!
By ‘overdoing it’ in depressing the strings so far towards the back of the guitar (towards your tummy) your subconscious mind gets the ‘feel’ of the desired movement of string engagement and release.
And if you can over-do it you can ‘under-do-it’, so to speak.
When you reach the stage of ‘Unconscious Competence’ with this skill, you’ve got it made!
You can also include the next technique to enhance this skill, namely: The Tightrope Walker Technique…
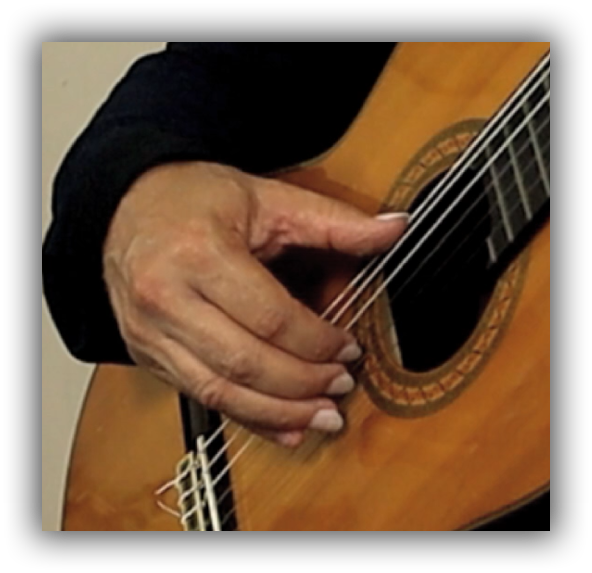 Classical Guitar - String Squeeze Method
6. The Tightrope Walker Technique
Here’s how it works:
This particular classical guitar technique helps to consolidate the previous one in that you depress the strings (much more than 'normal playing') whilst practising it.
I call it the Tightrope Walker Technique because as your fingers depress the strings towards your tummy (or back of the guitar) they look like legs walking across a tightrope as the weight of the walker pushes the rope down (especially in the middle).
Again, you’re ‘overdoing it’ so you can ‘under-do it’, so to speak.
Once learned by the subconscious mind, you have a great range of movement to help with increasing or decreasing volume, and the correct technique of string depression to produce a quality of sound in terms of tone color and musicality.
Here’s the deal:
Step 1:
Start on the 6th ‘E’ string (closest to your eyes) and place your ‘i’ and ‘m’ fingers on the same string.
Step 2:
Depress the string with your ‘i’ finger quite forcefully towards the back of the guitar or your tummy about ½ to 1 cm.
Release the pressure so that your fingers are back on an equal position then do the same with the ‘m’ finger.
You are NOT playing the note in this exercise, just depressing the string and guiding it back to its start point with your finger.
Step 3:
Continue the same movement progressing through all the strings until you get to the ‘top’ treble ‘E’ string.
Step 4:
Now go in reverse with the same technique from the treble ‘E’ to the lower bass ‘E’ but START with the ‘m’ finger followed by the ‘i’ finger.
This is also obviously the reverse, but it gives you a chance to strengthen your separate fingers and develops your fine motor control in the process - an added bonus!
Step 5:
Use the same technique but use other combinations of your right-hand fingers i.e. ‘i’ & ‘a’, ‘m’ & ‘a’ etc.
Now you have two complimentary methods that will develop your classical guitar technique to produce controllable volume and a beauty of sound.
And the good news?
You can make this a habit within 21 days if you diligently and daily incorporate this into your practice routines and classical guitar technique!
Now we get to ‘balance’ things by practising a few techniques on the left hand, starting with the Hinged-Thumb Technique!
7. The Hinged-Thumb Technique
The Hinged-Thumb Technique allows you to be WAY more flexible when it comes to playing left-hand chords and managing difficult stretches on the fingerboard.
As it says, in this technique your thumb acts like a hinge to give you more movement and flexibility.
It is used in classical guitar technique but often is not as important in other styles of guitar, such as electric, because the electric guitar neck is often much thinner and smaller.
Also, the pick-ups used on electric guitars obviates the need for our
style of technique i.e. acoustic amplification.
What’s the bottom line?
You MUST position your thumb in the right position to give the most flexibility AND the most stability.
Here are the steps:
Step 1:
Place your left-hand thumb about 2/3’rds of the way up the back of the guitar neck where needed using the ‘pad’ of your thumb, NOT the ‘tip’ this time.
Your thumb is also directly in line with your first or second finger which plays the note (either single or part of a chord) on the fret-board, or in our case we’re starting on the 6th ‘E’ bass string...
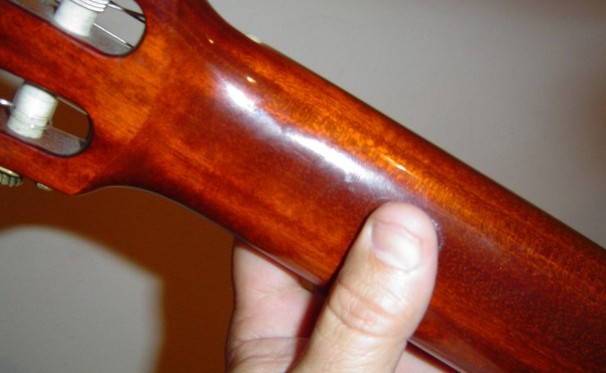 Classical Guitar - Hinged Thumb Method
Step 2:
Place ALL your fingers on the 6th ‘E’ bass string next to each other in a relaxed manner.
Step 3:
In that relaxed manner, move ALL your fingers at once (together on their own fret) from the bass ‘E’ string to the treble ‘E’ string by bending your wrist but using the thumb as a ‘hinge’ (which does NOT move from its position).
Doing this backward and forward gets you used to using the thumb in-situ and as a ‘hinged’ movement.
Step 4:
Keeping your first finger in place on the first fret of the 6th ‘E’ string, and your thumb in place directly behind it on the fret-board, stretch your little finger (4th) along the fret-board until it reaches the ‘A’ note on the 5th fret.
Again, by collapsing your wrist, you can reach the note quite easily and your hand remains stable.
Make sure you keep the pad of your thumb in place so that it doesn’t move from where you’ve planted it.
With practice, you’ll make this 2nd nature just like the other classical guitar techniques and methods. You’ll also be able to reach more difficult chords with good technique further into your classical guitar career...
8. The Ballerina Technique
As you’ve probably
seen, a ballerina is often up on her tippy-toes during a performance...
 Classical Guitar - Ballerina Method
In classical guitar technique we’re ALWAYS on our ‘tippy-toes’ but in our case the tips of our fingers of the left hand.
The reason we use the tips is because that is the BEST way to produce a clear, full note...
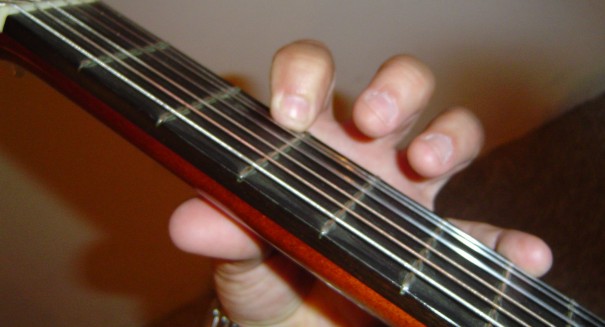 Classical Guitar - Use the Tips of Fingers
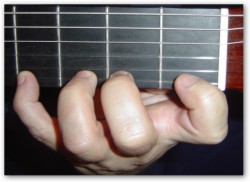 Classical Guitar - Fingers Near Frets
Conversely, if you use the pads of your fingers (the underside of your digits) there is every chance your note will be cut off or muted in some way.
This is because the extra skin could touch the string and mute or deaden the sound. Definitely NOT good classical guitar technique!
So, stay up on those toes, sorry – fingertips!
We also get to combine techniques now so that the ‘Squeeze’, ‘Tightrope’ and ‘Ballerina’ are used BUT we are playing notes this time!
Here’s how it works:
Step 1:
Place your first finger fingertip on the ‘F’ note on the first fret, 6th string. Using an alternating ‘i’, ‘m’ pattern play the first 4 frets of the guitar.
Next play the open ‘A’ string followed by the next 4 frets on that ‘A’ string. Continue doing this until you get to the 4th fret of the treble ‘E’ string (first string).
Step 2:
Now do everything in reverse i.e. go BACKWARDS from the 4th fret of the ‘E’ first string back to the open ‘E’ bass string, including the open strings.
Step 3:
Perform the same exercise with different right-hand fingerings i.e. i & a, m & a.
It is a left-hand exercise though so make sure you’re concentrating on the ‘Ballerina Technique’ and are up on your fingertips and NOT the underside ‘pads’ of your fingers.
Later, in a more advanced lesson, I’ll show you how to extend this ‘Ballerina Technique’ all the way up the 12th fret of the first string which helps consolidate your skills.
Also, you can see the correct technique is to keep the thumb straight (but not rigid).
The thumb actually acts as a pivot so that you can keep your balance when your wrist bends and your fingers stretch to reach around for more difficult finger positions, or chords.
Secondly, if you're conscientious about your technique, you should use the very tips of your fingers on the string as you push it down on the fret board.
You run the risk of the note not being correctly sounded If you use the "pads" of your fingers rather than the finger tips. Indeed, there is a very good chance the note will "buzz" or even be muted.
The muting is especially problematic for the strings under your finger i.e. the strings not being fingered but being slightly touched by the skin of your finger being used to play a note.
You can achieve this fingertip control by bending your knuckles at each joint as you attempt to play a note on the string.
If you looked side-on at the shape of your finger as it played a note it would look a little like the letter "C", only a little more "square".
Lastly, to achieve good left-hand guitar technique, you must finger the note on the fret board right next to the fret itself.
If you play too far away from the fret, you will tend to get a really annoying buzzing sound as you play the note.
If you play right on top of the fret you will tend to get a muting sound which is also not conducive to good music making...
Now it’s time for…
9. The Full Circle Method
Now that you’re ready to start practising more advanced classical guitar technique it’s time for one last method that is VERY important.
Pepe Romero once said in an interview for ‘Acoustic Guitar Magazine’…
“The word “tension” is a misleading thing. You need tension; the string needs to be tensed, stretched, to produce the sound. It’s almost like the good cholesterol and the bad cholesterol: There is good tension and bad tension.
The tension that is built because of the energy produced to move the string, that’s good tension. When you produce a sound, all the tension must go back to absolute relaxation. The tension must be very focused and pointed just to the string.
You must give yourself the time to do it in the cleanest, most precise, most energetically economical way…”
The ‘Bad Cholesterol tension’ he talks about is not a good thing to make a habit of.
Romero also said… “Tense guitarists don’t last”.
Consistency Starts with YOU!
So right from the very start we need to be aware of the tension in our bodies BEFORE we start playing, so it doesn’t insidiously ‘slip into’ our practice and playing routine and wreck our good classical guitar technique.
Fortunately, I have a great little method for you to use BEFORE you start playing that gets rid of that ‘bad cholesterol tension’ you might get throughout your body.
And just like all the previous techniques and methods mentioned in this lesson, if you practice this for 21 days and are aware of the aforementioned ‘4 Stages of Learning’, you’ll be able to incorporate this into your routine and make it a GOOD habit.
It is this:
Just before you start playing a piece, or practising scales, or whatever, take the time to mentally go around your body ‘Full Circle’ from head to toes and back again to check your level of tension in your muscles.
Here are the steps…
Step 1:
After you have sat down and placed the guitar in the proper playing position become aware of your head and neck area to see if you are experiencing any tension or tightening etc.
If you are, take a deep breath. And as you expel the air imagine that you are releasing the tension out of that area of your body and let that area relax.
Step 2:
Go to your shoulder and arm areas down to your fingertips and focus on it. If you feel your shoulder riding upwards through tension take another breath and let that tension go and be expelled from your body with the breath.
Step 3:
Do the same with your torso area.
Step 4:
Do the same with your leg and feet area.
Step 5:
Repeat those steps but in reverse i.e. from the feet/leg area until you reach your head/ neck area.
In this way you have gone ‘Full Circle’ throughout your body checking for tension and releasing it so you can be relaxed when playing and practising.
This can have a profound effect on your playing and tone production and overall sound.
If you become aware of any tension re-occurring when you’re practising, try to dispel the tension using that technique from your body.
Obviously, this is not possible in a public performance so ‘prevention is better than cure’, so to speak.
In other words, you need to get rid of this tension BEFORE you start to perform, and you need to make it 2nd nature via your subconscious mind.
And you now know how to do that via the ‘Full Circle Method’!
Now It’s Over to You:
I hope you got a ton of value from...
How to Improve Your Classical Guitar Technique Using 9 Actionable Steps in Only 21 Days!
(2023 Update):
The Definitive Guide to Developing Your
Classical Guitar Technique Foundations
And now I’d like to hear from you:
What do you think of them, and how are you going to apply these strategies from today’s guide?
Are you an absolute beginner, or do you have to learn and incorporate these techniques into an already established classical guitar technique?
Either way, let me know by leaving a quick comment right now...
Now it's your turn:
Let me know what you think with a comment below...
Did this make sense to you?
Can you apply these ideas immediately?
If you want some more great tips look at these classical guitar technique book recommendations...
Recent New Pages:
What is Classical Guitar Playing?
Arpeggio Beginner Guitar Lesson Classical-Fingerstyle Portal
Blog Technique Free Guitar Lesson
Guitar History Guitar Instruction Guitar Lessons
Guitar Time Line Malaguena Memorizing Music
Music Notation Music Notation Primer Sight Reading
Sight Reading Guide Theory Work Sheets Renaissance Guitar

New! Comments
Have your say about what you just read! Leave me a comment in the box below.