- Home
- Classical Fingerstyle Portal
- 15 Actionable Guitar Lessons
- Classical Guitar Technique
- Guitar Lessons
- Beginner Lessons
- Guitar History
- The Renaissance Guitar
- Guitar Time Line
- Classical Guitar Blog
- Contact
- About Author
- Site Search
- Privacy Policy
- Site Map
- Classical Guitar Study Course 3.0
- Instant Classical Guitar Repertoire
- Classical Guitar Lessons For Beginners
Beginner Guitar Lesson Series
A Free Classical Guitar Finger Style 'Primer Course' (2025 Update)
This Beginner Guitar Lesson series will help you learn and consolidate the proper skills and correct technique required to play classical guitar.
|
Also, these lessons on this page are relatively easy and so enable you to practice all the technical and musical requirements (listed below). With as little stress as possible! Some other points you need to concentrate on are to practice your pieces in slow motion... This is so the brain (or the sub-conscious) gets time to understand what it is you are trying to communicate to it. The sub-conscious doesn't care what you are teaching it... It will just attempt to do it! The "trick" is to teach it right from the beginning... |
Beginner Guitar Lesson #1:
|
Let’s do this!
Don't Just Get a Head Start - Get a FAST START!
One of the biggest challenges in learning to play classical guitar is to know where to start.
That's why I created the ‘Classical/Finger Style Guitar Lessons Portal’ which helps you to make a fast and logical start. You can join here...
https://www.learnclassicalguitar.com/Classical-Guitar-Fingerstyle-Portal
Oh, and did I mention - it’s FREE? 😊
Just
follow these 3 easy steps...
1. Enroll in the Classical-fingerstyle Lesson Portal here...
https://www.learnclassicalguitar.com/Classical-Guitar-Fingerstyle-Portal
2. Select the lessons you want to practice
3. Start making progress on the classical guitar
If you're really serious about learning classical guitar, you can also download your copy of...
"Ten Important Skills You Need as a Classical Guitarist" (inside the portal).
P.S. If you resonated with this idea I think you're going to love how the portal gives you an advantage and a fast start in playing classical guitar. You can join in literally seconds here...
https://www.learnclassicalguitar.com/Classical-Guitar-Fingerstyle-Portal
Beginner Guitar Lesson Skills in This Series
To summarise:
These are the skills you'll practice in this series:
* Beginner Guitar Lesson Skill: Alternating "i.m." fingers. If you use alternating fingers rather than just play with the one repeating finger your tone and overall sound will be better.
It is a most common mistake of beginning players to use one finger, and you need to be aware of WHAT you are doing WHEN you are doing it to make it a good habit.
* Beginner Guitar Lesson Skill: Using a combination of "open" (no fingers of left hand used) and closed (left hand fingers employed) strings;
* Beginner Guitar Lesson Skill: Apoyando (rest stroke);
* Beginner Guitar Lesson Skill: Tirando (free stroke);
* Beginner Guitar Lesson Skill: Using the thumb of the right hand to play a bass line melody;
* Beginner Guitar Lesson Skill: Developing more speed and fluency;
* Beginner Guitar Skill: Developing good habits from the start;
* Beginner Guitar Skill: Developing your reading of music notation and guitar tablature;
* Beginner Guitar Skill: Counting beats and rhythms, including tied notes and developing musical awareness;
* Beginner Guitar Skill: Developing the ability to play musically using legato (smooth and connected playing), staccato (short and detached notes), basic harmonics and develop your dynamic range (soft to loud)...
It has been said that the famous classical guitarist Julian Bream practices his whole repertoire for a particular concert in slow motion before he performs it (even at his level!).
I can attest to the veracity of the statement - it's a good idea!
Playing slowly also helps to develop your confidence and really, speed should be the last thing on your mind when learning the guitar basics.
Accuracy and quality of tone is of prime importance before anything else!
You'll also notice in some of the videos that I rest my thumb of the right hand on the lower "E" string as I'm using my "i.m." fingers. This provides more stability for the beginner when learning to use alternating rest stroke and is a good idea for an absolute beginner.
As you get more experienced and start to play harder music you'll need to be more "fluid" with both of your hands.,
Also, you will have also noticed after watching the videos that I count the beats before playing. This helps you with counting and timing in terms of beat (pulse) and rhythm (note lengths).
In fact, it is a good idea when you are a beginner to play the notes, tap your foot to the beat, say and even sing the notes of your piece, if it's an easy piece of course.
The best part?
When you're able to do all these things simultaneously, slowly and successfully, you'll be able to play the piece by itself a whole lot better.
It stands to reason that if you can play whilst multi-tasking, when it comes to just playing a melody it will be much easier.
Another benefit of employing this method is that you are analysing the music on a much deeper level than just playing the "black notes" and this leads to a much deeper and quicker understanding of the music.
It's certainly not easy at the beginning, but this is exactly why you practice - to get better!
Notice we are also discussing the QUALITY of your practice here. I suppose it's what is known universally as "being there".
Good luck with the beginner series!
P.S. If you can't view the PDF you might need to update your PDF reader from Adobe here...
Beginner Guitar Lesson #1: 'Hush Little Baby'
Beginner Guitar #1, 'Hush Little Baby', is the first in the sequence of the Beginner Guitar Series.
So we begin our journey by covering a few of the basics of stroke-making and melody production.
Note: If you haven’t already, do yourself a favor and go and study these pages BEFORE you attempt this piece as it will stand you in good stead in the long run...
* 15 Easily Actionable Guitar Lessons That Can Immediately Improve Your Knowledge, Tone Color and Sound Quality (Updated 2022)...
* Classical Guitar Technique: How To Improve It Using 9 Actionable Steps in Only 21 Days! (2022 Update)...
Have you done that? Great! Now let's get on with the Beginner Guitar Lesson #1…
Hush Little Baby is great practice for developing the phrasing of your melody using rest stroke (Apoyando in Spanish).
The numbers over the notes on the staff indicate what fingers are used by the left hand (to play the notes on the strings).
For example, you'll see above the notes on the first two bars: 0; 0; 0; 0; 1; 0; 3; 3; 3.
This just means that you play open string notes (no left hand fingering used) for the first 4 notes, followed by finger 1 (index finger) on the F note on the first string, first fret, then another open string note followed by the 3rd finger of the left hand playing the next three notes on the D, 3rd string, 3rd fret.
The indications for left hand can thus be 0, 1, 2, 3, and 4 a.k.a. open string, first finger, second finger, third finger, fourth finger.
The letters below the music notation i.e. "i" and "m" are indications of what the right-hand fingers are used. In this case, it means "indice" and "medio".
Let's discuss...
The tradition, if you're new to classical/Spanish guitar is to use the Spanish names for the fingers i.e.
* Pulgar (p) - Thumb of the right hand...
* Indice (i) - Index of the right hand...
* Medio (m) - Middle finger of the right hand...
* Annular (a) - Ring finger of the right hand...
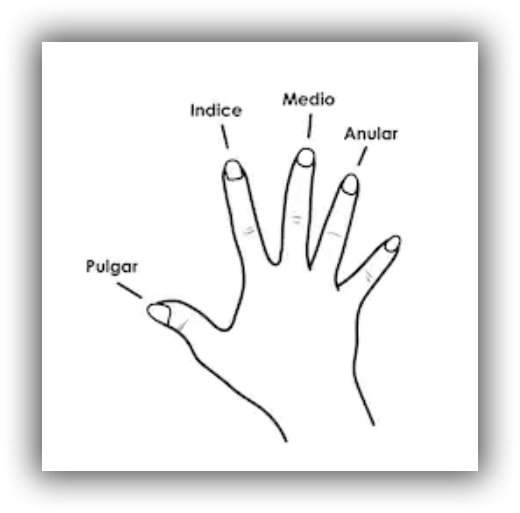 Right Hand Fingerings - Classical Guitar
In Beginner Guitar Lesson #1: Hush Little Baby, you only use the "i" and "m" fingers because you want to concentrate on the rest stroke.
A rest stroke is generally used when a note or phrase of notes needs to have more "oomph" or "extra weight" added to it. It is also commonly known as "apoyando," which is the traditional Spanish name for the stroke.
After the string is struck, your finger follows through and comes to rest on an adjacent string, e.g. If you're playing the rest stroke on the 1st or "E" string, your finger would come to rest on the "B" or second string after playing the note.
You generally hit the note with more force than you would play a free stroke note (see below), and the adjacent string "catches" the follow-through of your finger."
There is also a mixture of note types in Beginner Guitar 1. In fact, the note types used are:
* Eighth note (Quaver)...
* Quarter note (Crotchet)...
* Half note (minim)...
(Going left to right)
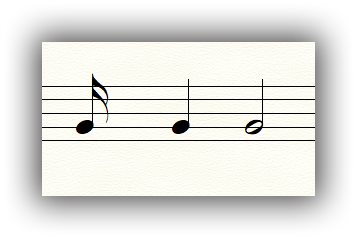 Musical Notes
If you're unsure of music notation, don't be afraid to look up a little theory, as it's not that hard, especially in this Beginner Guitar Series. Here's the link to the notation page...Music Notation Page
The notation is related to the time signature of the piece, which in this case is 4/4.
That just means that, in each bar of music, you have 4 beats per bar to the length of quarter notes, crotchets, or notes that make up that amount.
In the first bar, you have a crotchet, followed by 2 quavers, then 2 more crotchets.
This adds up to 4 crotchet beats per bar. In the last bar, you have two crotchets followed by a minim.
You can see that because the minim is worth 2 crotchets there is a total of 4 crotchet beats in the bar.
Alright, enough theory. Now go watch the video, look at the music (and/or tab if needed) and play along with me until you can play solo.
If the video is too fast at this stage just play on your own at a slower tempo until you can keep pace with the video.,
Remember, it's not a race. You need to take it slowly to lay the foundations for good technique that'll stand you in good stead in the years to come...
Here's the Beginner Guitar Lesson PDF of 'Hush Little Baby' in music notation and Tab. Just put your cursor on the PDF and you'll see the 'Download" and 'Print Icon' appear...
Beginner Guitar Lesson #2:'Ode To Joy'
Beginner Guitar Lesson #2: "Ode to Joy" is a theme from the last movement of Beethoven's 9th symphony. It is very famous and, of course, very well known...
 Ode to Joy
It provides us with the opportunity to continue the "rest stroke" practice we began in Beginner Lesson #1: Hush Little Baby.
Like that PDF, you'll notice that there are string and fingering indications on the music.
Not only is it a great little tune, but the melody notes are all quite close together so that, as a beginner, you're not really attempting any long stretches or difficult chord patterns.
There is, however, a new item to contend with, namely: dotted notes.
You'll notice in bars 4; 8; and 16 that there are notes with a little dot behind them. The function of the dot is to add to the note half as much as the original note...
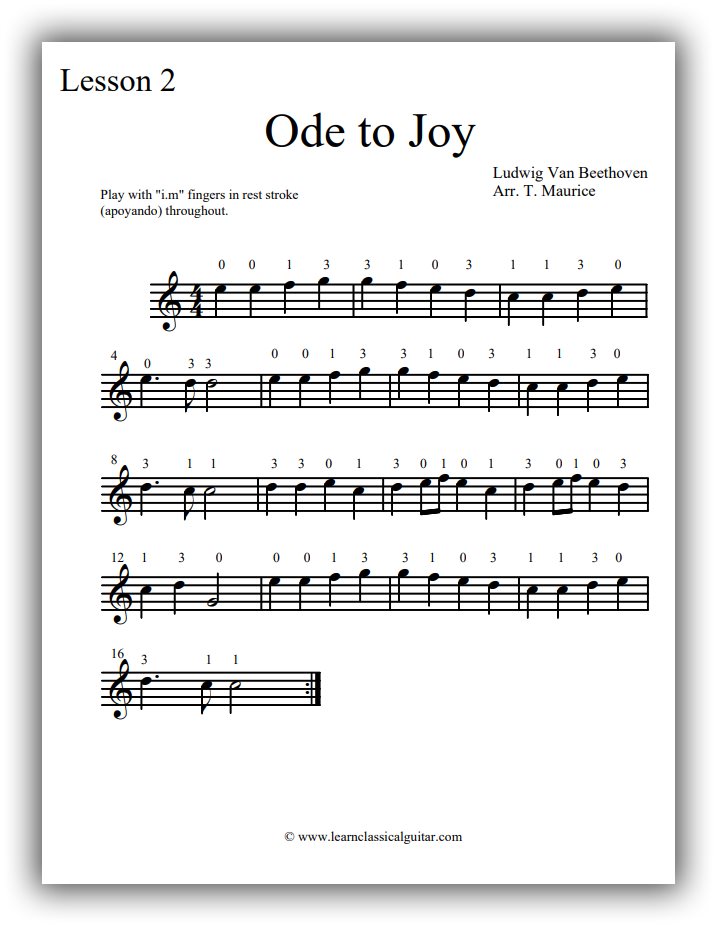 Ode to Joy for Classical Guitar
So that means that the "E" note in bar 4 has become one and a half beats long.
O.K. Let's backtrack a little...
The time signature (at the start of the music) is in 4/4 or 4 quarter (crotchet) note beats per bar. So, if the first beat was one quarter note and you added a dot to it, it becomes...
One + a half = one- and one-half beats long.
Because you've made that beat longer it must be taken from somewhere else. Otherwise, the overall beat count in the bar won't add up to its time signature count of 4/4.
Now you see the second note in the bar (D note) is only a half beat long. You can tell this as it has one tail on its stem.
The other D note immediately following that is a half note (minim), and it's worth two quarter notes. Now you can see the bar indeed adds up...
One and a half + a half + two beats = 4 beats.
Bars 8 and 16 are similar, but there are different notes.
Be sure to watch the video and play along when you can to get the feel of a dotted-note rhythm.
Here's the Beginner Guitar Lesson PDF of 'Ode to Joy' in music notation and tablature. Just put your cursor on the PDF and you'll see the 'Download" and 'Print Icon' appear...
Beginner Guitar Lesson #3: 'Yankee Doodle'
Beginner Guitar Lesson #3: 'Yankee Doodle' is the third lesson in this series.
Again, we'll be consolidating our rest stroke techniques and playing quarter and half notes in the music notation. There's a similar dotted rhythm pattern to consolidate your work from last lesson.
The big benefit of this piece is that we play more notes on the lower strings (Bass) of the guitar, AND we start using our right-hand thumb (Pulgar in Spanish) and co-ordinate it with the 'i' & 'm' fingers.
Let’s dive in:
The piece itself is in the key of G Major.
That means that the key signature at the start of the first bar will have a sharp on the "F" line of the staff, indicating that ALL other F notes (whether at that pitch or otherwise) will be played sharp, or 1 fret higher than usual...
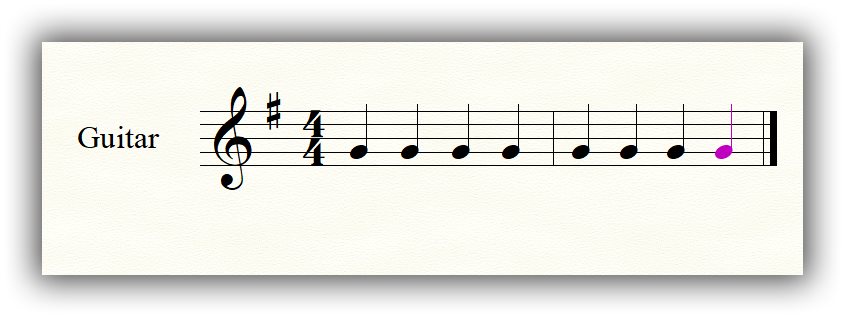 G Major
If you need to brush up a little on what I'm talking about, there's some good information included here...Theory Sheets
That's the reason why, for example, you use the 4th finger of the left hand when playing the F# note in bars 4; 7; 9; 10; 13; 14; 15 on the 4th fret of the 4th string.
Wow! Any more 4's and it would be a 4 overload! :))
It does make it easy to remember where and what to play...444.
An important point to remember is that when you use your thumb you DON'T bend it at the first joint when playing the string.
Keep it straight but relaxed.
The actual movement of your thumb is like a pencil "drawing" a little circle towards your belly.
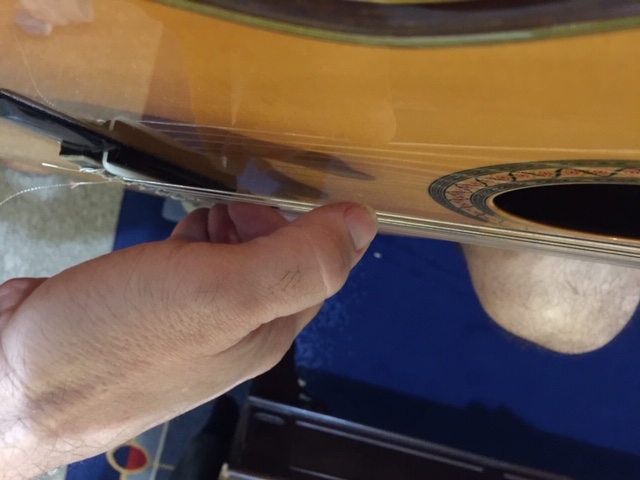 Don't Bend Your Thumb! - Classical Guitar Don't Bend Your Thumb! - Classical GuitarIncorrect Thumb Position |
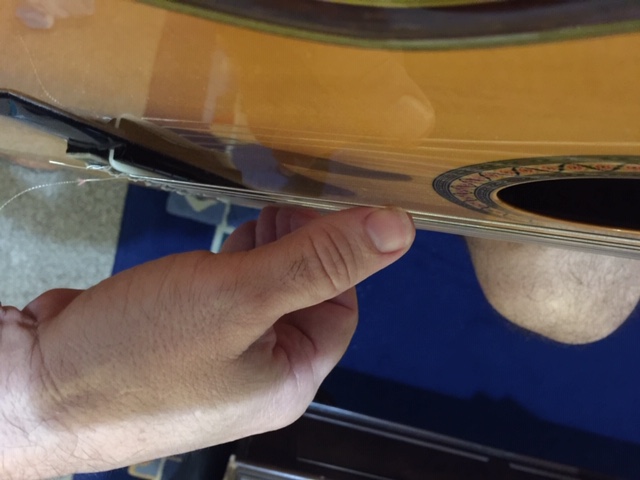 Correct Thumb Position - Classical Guitar Correct Thumb Position - Classical GuitarCorrect Thumb Position |
If you think of the tip of your thumb as the tip of the pencil, it is moving around and around drawing a small arc not jumping up and down vertically or bending at the joint. You can see that in action below in the video.
You need this skill as many pieces, like this one, have the melody in the bass notes on occasion and you need to continue the good tone quality when changing from the other fingers to the thumb.
That is, there should be no discernible tone quality change as you make the change to different fingerings.
That's also another reason to have your nails in good shape so that there's consistency in sound between the various nails of the right hand. You can swat up on that topic here...
* 15 Easily Actionable Guitar Lessons That Can Immediately Improve Your Knowledge, Tone Color and Sound Quality (Updated 2022)...Just scroll down the page until you find...
12. Shaping Your Nails Guitar Lesson: Improve your sound dramatically with the correct nail shape approach...
Good luck with this lesson, and as always...
ENJOY!
Here's the Beginner Guitar Lesson PDF of 'Yankee Doodle' in music notation and tablature. Just put your cursor on the PDF and you'll see the 'Download" and 'Print Icon' appear...
Beginner Guitar Lesson #4: 'Michael, Row the Boat Ashore'
Beginner Guitar Lesson #4: Michael, Row the Boat Ashore has a few new skills for you to work on as well as consolidating skills learnt in previous lessons.
Apart from playing both dotted note rhythms and quarter and half notes we move onto using whole notes (semibreves) and a Glissando or slide and an Anacrusis or Upbeat.
As the name suggests, a whole note takes up the whole bar in which it is situated. In other words, the one note played will last the entire measure or bar until you come to a new bar and another note is struck...
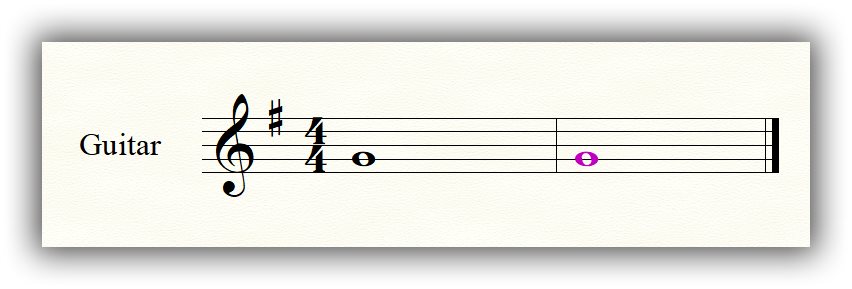 Whole Notes
You can see an example of this in bar 4 of Beginner Guitar 4, where you play an open string (1st string) "E" note for the entire bar.
Be careful not to put your finger back on the string once you've struck the note; otherwise, it will be truncated and spoil the melody line. It's all part of the overall tonal quality and performance for which you're striving, so make sure to use care in your performance.
If you inculcate good habits early your playing will improve at a faster rate. You see you won't be continually back-tracking to fix previously entrenched bad habits.
A Glissando is a slide. In this case, I've put one in bars 11 to 12 between the "D" to "E" notes and back to the "D" note.
You'll notice in this very same phrase in bars 3, 4 & 5, I play the open string E note rather than use the slide.
This highlights the different ways you can perform phrases on the guitar and gives you a "gentle" introduction into playing a glissando or slide.
The technique is performed by lessening the pressure applied to your finger on the D note WITHOUT lifting your finger off the string.
Yes, that’s right your finger stays in contact with the string the whole time from when you shift up to when you shift back. This creates a nice, "warm" tone to the phrase and is considered very musical.
You might notice the slight Vibrato as well once I reach the upper note. This is a slight "swelling" of the note and again, it is considered very musical and appropriate. Don't be tempted, however, to over-do it!
There's nothing worse in terms of musicality to see someone performing both glissando and vibrato with all the grace and charm of a 500-pound gorilla! :))
Seriously though, watch videos on YouTube of people like John Williams and Julian Bream, to name just two. They will give you a wonderful example of crisp technique with musicality, panache and gravitas!
To see some more info. On Vibrato and Glissando look here...
* 15 Easily Actionable Guitar Lessons That Can Immediately Improve Your Knowledge, Tone Color and Sound Quality (Updated 2022)...The other topic we need to discuss is the Anacrusis.
An anacrusis is also called an upbeat. It is a note or notes "taken" from the last bar of the music and placed right at the beginning of the music:
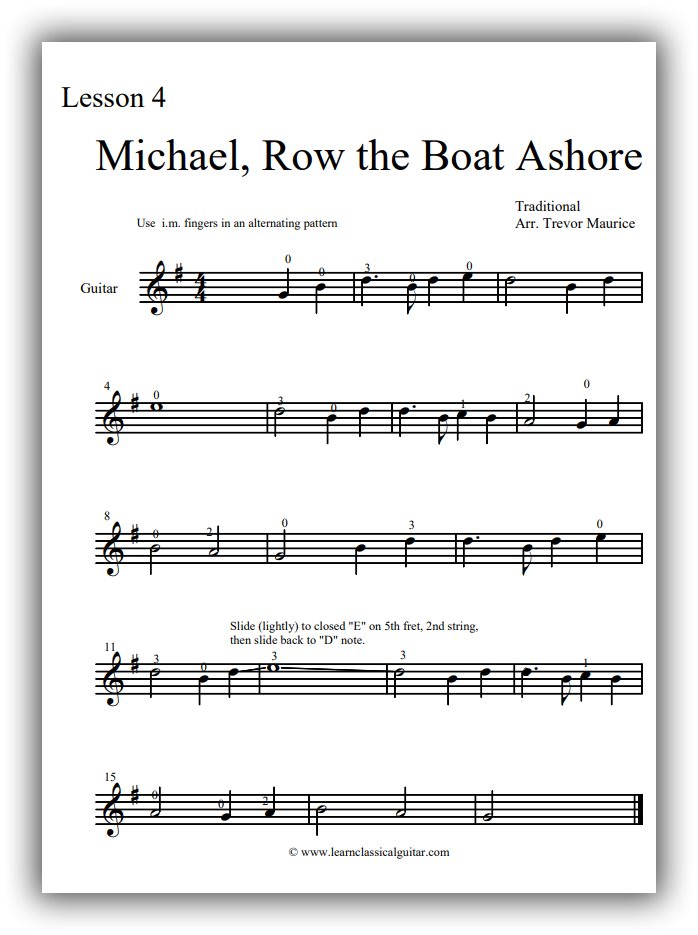 Michael, Row the Boat Ashore - Classical Guitar
As you can imagine, this is not a full bar of music (and neither is the last).
The effect of the anacrusis or upbeat is to accent the first (and some say subsequent) note(s) of the next bar(s) to give it an even stronger feel.
It just gives the music more character, flair, and interest. I hope this lesson has been instructive and useful for you.
Enjoy!
Here's the Beginner Guitar Lesson PDF of 'Michael, Row the Boat Ashore' in music notation and tablature. Just put your cursor on the PDF and you'll see the 'Download" and 'Print Icon' appear...
Beginner Guitar Lesson #5:Surprise Theme by Haydn'
Beginner Guitar Lesson #5: The Surprise Theme by Haydn was one (some used to say) he used to play a trick on an unsuspecting public. If they dared to "nod off," during the performance, they were sure to get an awakening shock!
It's a great story, but not actually true. As you can see on Wikipedia...
"Haydn's music contains many jokes, and the "Surprise" Symphony includes probably the most famous of all: a sudden fortissimo chord at the end of an otherwise piano opening theme in the variation-form second movement.
The music then returns to its original quiet dynamic, as if nothing had happened, and the ensuing variations do not repeat the joke.
In Haydn's old age, George August Griesinger, his biographer, asked whether he wrote this "surprise" to awaken the audience. Haydn replied:
No, but I was interested in surprising the public with something new and in making a brilliant debut, so that my student Pleyel, who was at that time engaged by an orchestra in London (in 1792) and whose concerts had opened a week before mine, should not outdo me.
The first Allegro of my symphony had already met with countless Bravos, but the enthusiasm reached its highest peak at the Andante with the Drum Stroke. Encore! Encore! sounded in every throat, and Pleyel himself complimented me on my idea..."
http://en.wikipedia.org/wiki/Symphony_No._94_(Haydn)
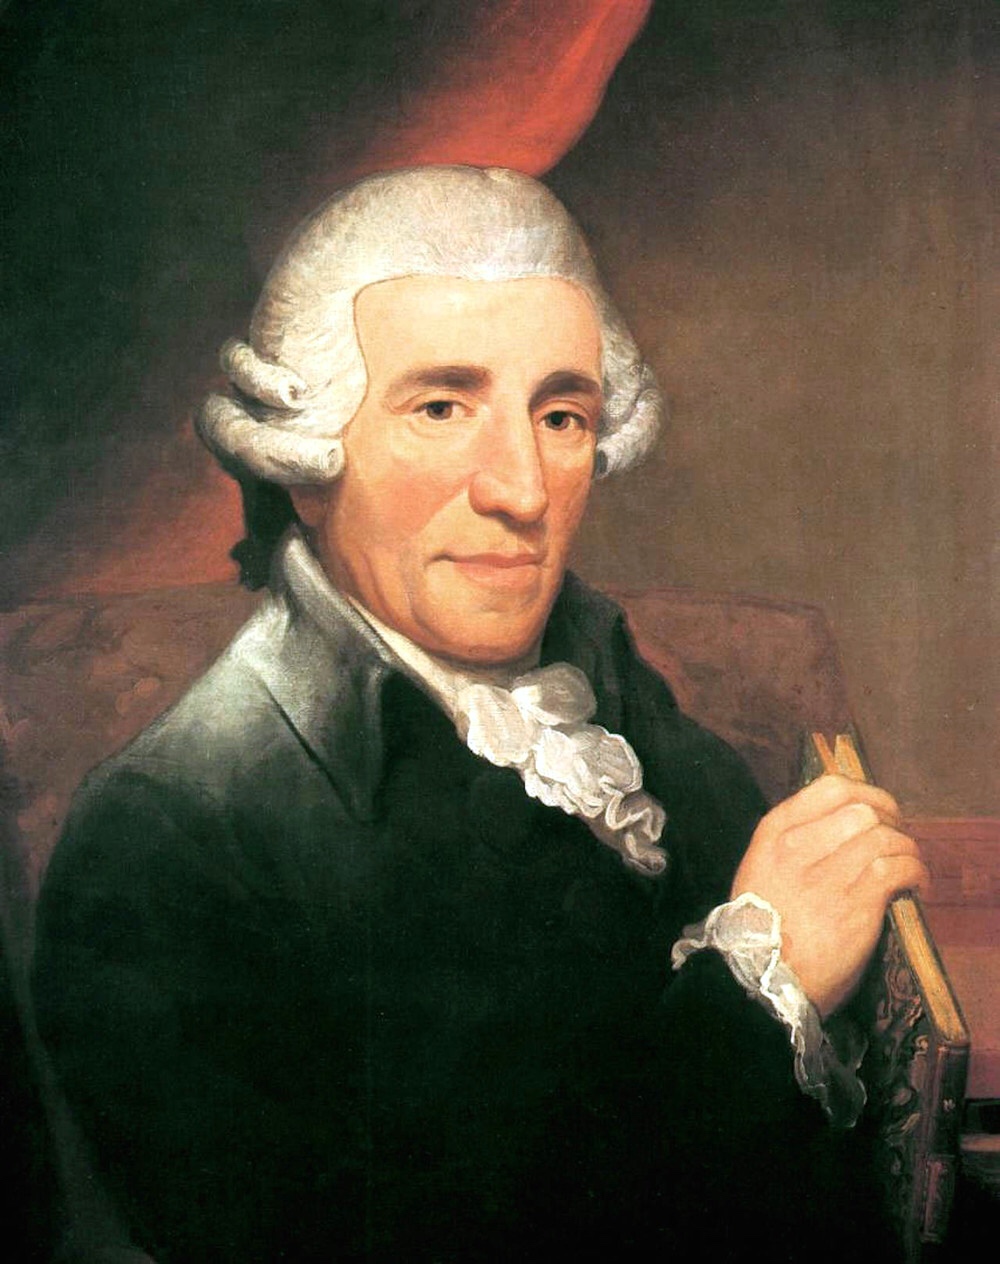 Surprise Theme by Haydn for Classical Guitar
By Thomas Hardy - Unknown, Public Domain, https://commons.wikimedia.org/w/index.php?curid=620261
Although the same effect is not possible on guitar compared to a full symphony orchestra, it does, however, let us practice our dynamics (loud to soft) in a fun way.
You'll also notice that, in the second section of Beginner Guitar 5, (namely: bars 9 - 14) we change from rest stroke (Apoyando) to free stroke (Tirando) for the first time in this series.
You'll remember from the first lesson that free stroke, as opposed to "rest stroke", is a quicker lighter stroke on many occasions and for this section in the music it is indeed perfect.
The reason we play free stroke here is because of the grouped quaver notes. The count of the beats you play is, therefore...
1 & 2 & 3 & 4 & (mostly)
...striking a note on each of the counts AND the &'s. You need to play them in a relaxed, clear but effective and smooth way like the previous 8 bars.
I say "similar to the first 8 bars" because if you look above the notes in those bars you notice a curved line scanning several bars at a time.
This is not a "tie".
A tie means the notes are connected across a bar of music.
This adds to the note length.
]This line is a "slur" (not a normal guitar slur) or an indication to play the notes under the line "legato" or smooth and connected.
It's a bit easier than the final bars where you're playing faster but once established in the piece, you should endeavor to play the whole thing legato, even if you're playing faster due to the note groupings.
The last point of note in this piece is to play the chord in bar 8 both loud and slightly staccato.
Staccato is the opposite of legato and means "short and detached".
If you add the loud dynamic at this point, it gives you a great, and humorous distinction between the rest of the music. The way to achieve this effect (detached) is to put the right hand fingers that just played the notes straight back on the strings.
You don't want any extra or ongoing string noise to achieve maximum effect.
Enjoy!
Here's the Beginner Guitar Lesson PDF of 'Surprise Theme by Haydn' in music notation and tablature. Just put your cursor on the PDF and you'll see the 'Download" and 'Print Icon' appear...
Beginner Guitar Lesson #6: The Drunken Sailor'
Beginner Guitar Lesson # 6: The Drunken Sailor lets 'step up another level'.
The 16th note is distinguished by having two tails on its stem. The count for the rhythm in this piece is a bit unusual.
Because the 16th notes aren't consistent throughout, there's a bit of a "syncopated" feel to the music.
Syncopation means...
"A temporary displacement of the regular metrical accent in music caused typically by stressing the weak beat…"
https://www.merriam-webster.com/dictionary/syncopation
The time signature is 2/4, or two quarter note beats per bar. That would add up to 8 x 16th notes per bar.
The rhythm here is not predictable.
The actual count in bars 1, 3, 6, 17, 19 & 21 gives it its particular feel. Instead of all beats being played...
1 a & a 2 a & a...the actual rhythm is...1 a & a 2 a & a
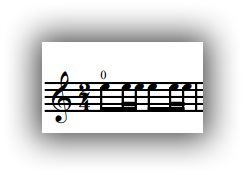 The time signature is 2/4
Another point of note in this lesson is the use of repeat signs. There are, in fact, 3 sections to this piece of which 2 have repeated sections. A repeat sign is where you see a thick bar line next to the normal thin bar line and two dots between the middle spaces. Here is a graphic of what I'm talking about:
 Repeat Sign Music
In the first section, it means to play the music up to this sign and then return to the beginning to play that section again. Next, you move to the next section and play that music. Only return to where this next section started, NOT right back to the beginning.
We also venture up the fretboard a little with this piece. In bars 6, 12, and 14, you play the "A" note on the first string, 5th fret, with the 4th finger of your left hand.
You'll notice in the video below that, just prior to playing that note, I moved slightly up the fretboard. I do this with my thumb still in contact with the fret board at the back, as it guides me into position and back again with ease.
Don't worry too much if you can't keep up with the speed of the piece. As you improve and your technique develops, you'll become more adept at playing at a quicker tempo.
I hope this lesson was of value to you.
Enjoy!
Here's the Beginner Guitar Lesson PDF of 'Drunken Sailor' in music notation and tablature. Just put your cursor on the PDF and you'll see the 'Download" and 'Print Icon' appear...
Beginner Guitar Lesson #7: 'When the Saints Go Marching In'
Beginner Guitar Lesson #7: When the Saints Go Marching In lesson focus is...
Holding the note...
Yep, that's right!
It's a skill you need if you want to maximize your performance and play in a musical fashion. Luckily, you can focus on this skill because you almost certainly will know the music, the famous "When the Saints Go Marching In".
This tune has probably been around since the American Civil War, or even before since it is an American gospel hymn. But who really knows?
Indeed, the famous Louis Armstrong recorded the tune with his jazz band in the 1930's and popularized it for evermore.
But I digress...
You see, to carry a melody and have it play an integral part of the overall performance you need to hold certain notes either in melody or, more importantly, in the harmony. We start by practising it in a relatively easy melody form so that we can concentrate and focus on the skill.
When we have then 'absorbed' that into our repertoire of skills we move on to performing it in harder pieces.
So, not only do we have a higher number of longer notes i.e. half notes and whole notes, but we also have notes tied over the bar e.g. bars 2 to 3, 4 to 5, 8 to 9, 12 to 13 and 16 to 17 (bar 1 is the anacrusis)...
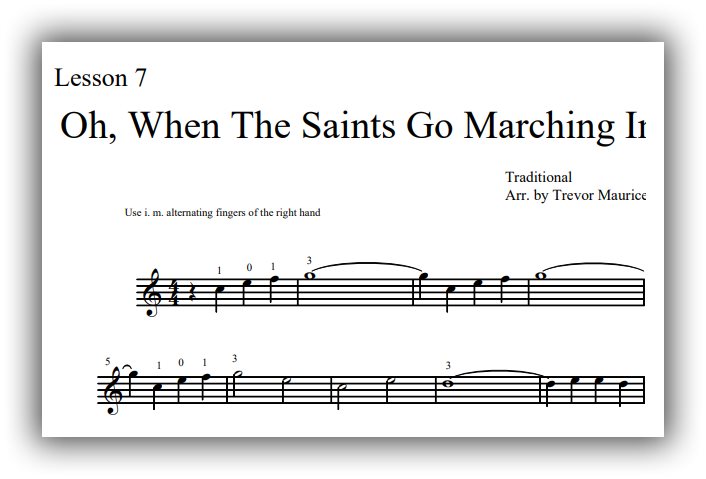 When the Saints Go Marching In - Classical Guitar
That is, because the first beat of the bar is a rest, it makes the next three notes a "lead-in" to the next bar, where the first beat of the bar is now stronger. If you count it out loud, you can feel it: 2, 3, 4, 1,...
So those high G notes are quite strong in comparison to the other notes.
Another skill we need to develop is the ability to be able to cross strings. That is if you look at bar one we play on 2 different strings in successive notes.
To be able to do this effectively and smoothly we need to practice this skill again in simplified form before we move on to more difficult pieces. This piece is excellent for that.
I hope you enjoy your lesson!
Here's the Beginner Guitar Lesson PDF of 'When the Saints' in music notation and Tab. Just put your cursor on the PDF and you'll see the 'Download" and 'Print Icon' appear...
Beginner Guitar Lesson #8:'The Ash Grove'
In Beginner Guitar Lesson #8: The Ash Grove, we start to see all the skills we've covered in the prior lessons come together in a longer, more demanding fashion.
The Ash Grove is a great little tune, but it's more demanding in the fact that you're required to play longer and so sustain your performance. It is also quite a quick tempo in comparison with most of the other beginner pieces.
You tend to make more errors under pressure of speed than at any other time, so I suggest you practice this one slowly and build up speed gradually until you can manage it at the quicker tempo.
The skills to be consolidated from prior lessons are:
* Repeated sections;
* String crossing;
* Slide or Glissando;
* Legato melody playing;
* Mixed rhythms and note groupings...
Remember, the repeat is where you see two dots at the end of a double bar line like this...
 Bar Repeat
The slide, or glissando, is where you lightly lift the pressure from the string and move from one note, or fret, to another. You don't lift your finger off the string entirely, but rather use the string to 'guide' your finger to the next position.
This skill takes time, and you need to perform repetitive practice to consolidate the skill and gain that 'light', graceful touch. You can see a slide in action here...
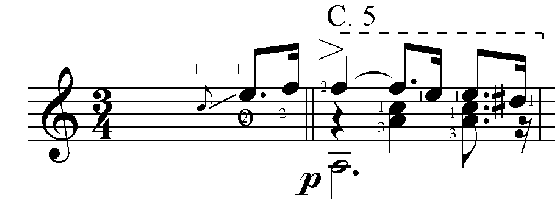 Glissando - Classical Guitar
Legato means "smooth and connected" and assists you in playing with a more appealing tone or sound. It is contrast to the term "staccato," which means short and detached notes...
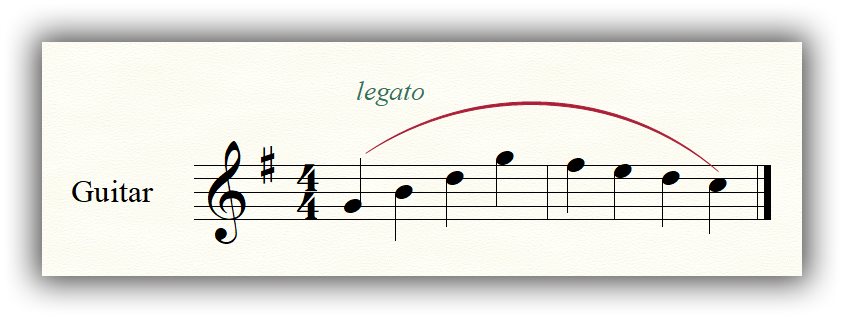 Legato - Classical Guitar
Staccato is also used for effect, but as with all techniques, if they're overused, the music becomes compromised in terms of taste and musicality...
 Staccato - Classical Guitar
See if you can keep up with the video once you have practiced all the skills slowly first.
Additionally, as a consolidation exercise, I want you to write in the correct left-hand fingering (including "0" for open string) from bar 14 to the end of the page.
You can "cheat" if you want to by looking at the previous bars to see which finger is used for a particular note.
Good luck and enjoy!
Here's the Beginner Guitar Lesson PDF of 'The Ash Grove' in music notation and Tab. Just put your cursor on the PDF and you'll see the 'Download" and 'Print Icon' appear...
Beginner Guitar Lesson #9: 'Minuet in G Major by Bach'
Beginner Guitar Lesson #9, the great J.S. Bach tune Minuet in G Major by Bach, will determine if you're ready to move onto more difficult repertoire in the form of harmony (chords & multiple voicing) other than just playing a melody line.
This is in addition to the next lesson, namely: Menuet in G, also by J.S. Bach.
Remember that chords are two or more notes that are grouped together (often vertically) that belong to the key of the piece, in this case G major. Further to that, harmony is how chords are constructed and how their 'progressions' fit together.
Melody, on the other hand, is how individual notes move through the music in a 'horizontal' fashion.
Bach, however, was a master of 'counterpoint', which is how the melodic lines interweave with each other throughout the music...
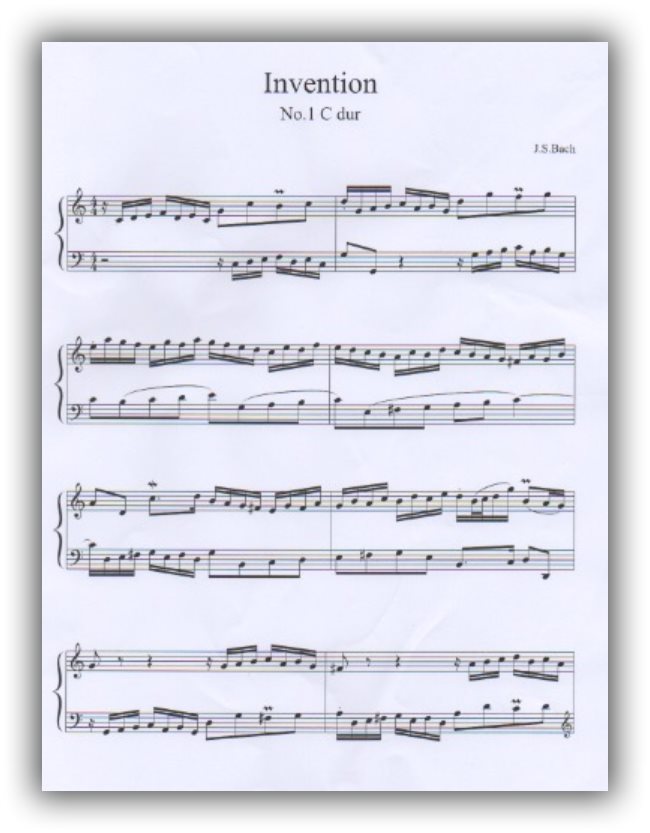 Bach was a master of counterpoint
"Counterpoint is when you have two or more melodies that work independently from each other but when they are played together, they create harmony (chords).
A proper use of counterpoint would be to have each of the melodies using different rhythm values so that the melodies are not just the notes changed but the note value as well.
For example having the bass playing crochets (quarter notes) and the treble playing quavers (eighth notes)."
https://hndwilliamallman.wordpress.com/2015/05/12/counterpoint-analyse-j-s-bach/
Bach's music was also said to be a great example of polyphonic music, which is how the separate individual voices (be they human or instrumental) are related to each other.
Even in a piece like Minuet in G major you can get a real feel for Bach's genius, to express so much in so few bars of music.
Again, if you feel you are playing this, mainly melodic, tune with ease, it is time to step up to chords and more difficult harmony.
By now you should have developed your rest stroke and free stroke skill sufficiently to do this even if you're playing at a slower tempo. Play the music slowly without mistakes rather than play fast, but full of errors.
Again, this piece runs the gamut of previously learned skills, and they come together nicely so that you may consolidate before you progress.
There are repeated sections lower bass notes played with the thumb; sharp notes played one fret higher than normal; moving up the fret board; quaver runs and, in this instance, a time signature of 3/4 or waltz time.
In waltz time, the beats of 1, 2, 3 are played: strong, weak, weak; strong, weak, weak.
That's what gives the waltz it's particular 'flavor'. You certainly should have a lot of fun playing this one!
Enjoy!
Here's the Beginner Guitar Lesson PDF of 'Minuet in G major by Bach' in music notation and Tab. Just put your cursor on the PDF and you'll see the 'Download" and 'Print Icon' appear...
P.S. You can read more on Counterpoint here...
Beginner Guitar Lesson #10: 'Menuet in G Major by J.S. Bach'
Beginner Guitar Lesson #10, Menuet in G Major by J.S. Bach is another great piece to practice your i.m. fingers and thumb for bass.
Like Beginner Guitar Lesson #9, it is rather longer than the others and will help you to develop your sustained playing.
Other technique practice includes:
* Playing of repeats;
* Use of accidentals (see below);
* Crossing strings;
*Dotted notes;
* Triplets;
* Harmonics;
* Staccato and legato...
An accidental is a sharp or flat note played within a bar. However, it is not denoted in the key signature. The effect of this is to add interest basically to the melodic or harmonic line...
 An accidental is a sharp or flat note played within a bar.
A triplet is 3 notes played in the time of two. Conversely, a duplet is two notes played in the time of three, although you don't see that in this piece.
Harmonics and staccato can be problematic if you're a beginner at the technique. If you want to understand these topics a little more fully go to this page...
While we're on the topic of the differing theory aspects of music, it might be timely if you start reading and completing some theory exercises. There are quite a few topics on the page, namely:
* Basic Music TheoryPlease don't skimp on your learning because if you build the foundation of your knowledge, your overall musicality and depth of musicianship shall also increase.
Additionally, Beginner Guitar Lesson #10, Menuet in G Major by Bach, is a very well-known and much loved tune.
The melody really 'gets a hold of you' and swells round in your head for hours afterwards. Don't forget, in waltz time the beats of 1, 2, 3 are played: strong, weak, weak; strong, weak, weak.
Enjoy!
Here's the Beginner Guitar Lesson PDF of 'Menuet in G major by Bach' in music notation and Tab. Just put your cursor on the PDF and you'll see the 'Download" and 'Print Icon' appear...
Beginner Guitar Lesson - Frequently Asked Questions
1.
What is the best way to practice as a beginner classical guitarist?
1. What is the best way to practice as a beginner classical guitarist?
The best way is to practice slowly, with focus on accuracy and tone. Playing in “slow motion” helps your brain absorb movements correctly and prevents bad habits from forming.
2.
What is the difference between a rest stroke (apoyando) and a free stroke
(tirando)?
2. What is the difference between a rest stroke (apoyando) and a free stroke (tirando)?
A rest stroke pushes through the string and comes to rest on the adjacent string, producing a stronger tone. A free stroke moves past the string without touching another, giving a lighter, more flowing sound.
3.
Should I learn music notation or just guitar tablature as a beginner?
3. Should I learn music notation or just guitar tablature as a beginner?
Both have value. Tablature shows you where to place your fingers, while notation develops your rhythm, timing, and deeper musical awareness. Many beginners use both together.
4.
Why do I need to alternate my right-hand fingers instead of just using one?
4. Why do I need to alternate my right-hand fingers instead of just using one?
Alternating fingers (i and m) creates smoother tone, increases speed, and builds good long-term habits. Using just one finger often leads to uneven sound and tension.
5.
How important is counting beats when learning guitar?
5. How important is counting beats when learning guitar?
Counting is essential. It helps you play with correct rhythm, stay in time with others, and perform music more musically. Beginners often tap their foot or count out loud.
6.
What are tied notes, and how do they affect my playing?
6. What are tied notes, and how do they affect my playing?
Tied notes connect one note across two measures, extending its duration without replaying it. They require you to hold the note for its full value, improving musical expression.
7.
How can I avoid tension in my hands when practicing guitar?
7. How can I avoid tension in my hands when practicing guitar?
Stay relaxed, use proper posture, and take breaks. Avoid gripping too tightly with the left hand and make sure your right-hand movements are smooth and natural.
8.
What are some easy classical guitar pieces I can start with?
8. What are some easy classical guitar pieces I can start with?
Great beginner pieces include Hush Little Baby, Ode to Joy, Yankee Doodle, Michael Row the Boat Ashore, and When the Saints Go Marching In. These use simple melodies and reinforce essential skills.
9.
Do I need long nails to play classical guitar well?
9. Do I need long nails to play classical guitar well?
Not necessarily. Some guitarists play without nails, but shaping nails properly can improve tone and consistency across your fingers. I DO prefer to have nails myself, although I often experiment with nail length.
10.
How long should I practice each day as a beginner?
10. How long should I practice each day as a beginner?
Consistency is more important than long sessions. Start with 15–30 minutes daily, focusing on quality practice. Over time, you can increase to 45–60 minutes as your stamina improves.
Recent New Pages:
