- Home
- Classical Fingerstyle Portal
- 15 Actionable Guitar Lessons
- Classical Guitar Technique
- Guitar Lessons
- Beginner Lessons
- Guitar History
- The Renaissance Guitar
- Guitar Time Line
- Classical Guitar Blog
- Contact
- About Author
- Site Search
- Privacy Policy
- Site Map
- Classical Guitar Study Course 3.0
- Instant Classical Guitar Repertoire
- Classical Guitar Lessons For Beginners
15 Easily
Actionable Guitar Lessons:
Immediately Improve Your Knowledge, Tone Color and Sound Quality!
Guitar Lessons...
Imagine if you could make one simple change or tweak to your classical guitar playing and knowledge and see an instant improvement in tone color and quality of sound…
Or better than that:
What if there were 15 simple tweaks or changes you could implement that resulted in a huge improvement in your sound and tone color on classical guitar?
I bet you’d be very excited to read about them!
Well, you’re in luck, because that’s exactly what I’m about to share with you today!
15 highly actionable classical guitar lessons, tips and information you can use to improve your playing within days...
- Use this little-known technique to make your Barre chords sound cleaner and easier to play
1. Barre Chord Guitar Lesson Click 'HERE' to go there now!
- Put some ‘Spice’ into your classical guitar playing with these fun and exciting flamenco techniques
2. Flamenco Guitar Lesson Click 'HERE' to go there now!
- Make your hammer-ons and pull-offs crisp and clear with the proper Slur technique
3. Slurs Guitar Lesson Click 'HERE' to go there now!
- Add interest and musicality to your playing with a judicious addition of Staccato
4. Staccato Guitar Lesson Click 'HERE' to go there now!
- When used properly, Vibrato can add emotion and feeling to your playing
5. Vibrato Guitar Lesson Click 'HERE' to go there now!
- Make your phrasing ‘crisp and clear’ with the right Damping technique
6. Damping Guitar Lesson Click 'HERE' to go there now!
- Learn to glide over the strings with this sweet technique
7. Glissando Guitar Lesson Click 'HERE' to go there now!
- Learn how to prepare your fingers for smooth movement that makes your playing professional
8. Guide Fingers Guitar Lesson Click 'HERE' to go there now!
- How to Pizzicato pluck the strings with style
9. Pizzicato Guitar Lesson Click 'HERE' to go there now!
- Play ‘bell-like’ harmonics that give your playing an added Resonance
10. Harmonics Guitar Lesson Click 'HERE' to go there now!
- Quickly develop correct hand position to create more beautiful music
11. Guitar Hand Position Lesson Click 'HERE' to go there now!
- Improve your sound dramatically with the correct nail shape approach
12. Shaping Your Nails Guitar Lesson Click 'HERE' to go there now!
- Learn how to quickly re-tune your guitar for a rich, deep bass
13. D-Drop Tuning Guitar Lesson Click 'HERE' to go there now!
- Quickly read guitar tabs to make more music accessible
14. Guitar Tablature Lesson Click 'HERE' to go there now!
- Make your trills, crisp, snappy and exciting
15. Trill Guitar Lesson Click 'HERE' to go there now!
 My Home Classical Guitar Teaching Studio
Don't Just Get a Head Start - Get a FAST START!
One of the biggest challenges in learning to play classical guitar is to know where to start.
That's why I created the ‘Classical/Finger Style Guitar Lessons Portal’ which helps you to make a fast and logical start. You can join here...
https://www.learnclassicalguitar.com/Classical-Guitar-Fingerstyle-Portal
Oh, and did I mention - it’s FREE? 😊
Just
follow these 3 easy steps...
1. Enroll in the Classical-fingerstyle Lesson Portal here...
https://www.learnclassicalguitar.com/Classical-Guitar-Fingerstyle-Portal
2. Select the lessons you want to practice
3. Start making progress on the classical guitar
If you're really serious about learning classical guitar, you can also download your copy of...
"Ten Important Skills You Need as a Classical Guitarist" (inside the portal).
P.S. If you resonated with this idea I think you're going to love how the portal gives you an advantage and a fast start in playing classical guitar. You can join in literally seconds here...
https://www.learnclassicalguitar.com/Classical-Guitar-Fingerstyle-Portal
Are you ready for some of the best online guitar lessons?
Then let’s start!
Classical Guitar Lesson Tip #1: Barre Chords
You might think that a Barre Chord guitar lesson is to difficult to play, especially for beginners. But if you know this little secret I’m going to reveal, they become MUCH easier to play. It’s all to do with the ridges in your fingers and how you need to make a slight adjustment to make the Barre chord ‘clean’…
If you’re not familiar with the barre chord here is the definition…
“Barre Chords are a type of guitar chord where one or more fingers are used to press multiple strings across the fingerboard in a downward motion..."
The way I've found best to play these chords is this:
Step 1:
Place your 1st finger as flat as you can across the strings at the fret where you want to play the chord.
Step 2:
Turn your finger slightly to the side closest to your thumb so that you can avoid the ‘ridges’ in the digits of your fingers. The effect is to have a ‘flatter’ surface on which to perform the Barre.
Step 3:
Make sure your first finger is in line with your thumb at the back of the neck. Apply pressure so that the strings are fully pressed down on the fret-board.
Step 4:
Add your other fingers to complete the chord then play each note individually and then as a chord strum, perhaps with the right-hand thumb. If there are any muted notes check where and adjust your finger accordingly.
Here are two photos of me playing a full barre (across six strings) and a half (across four strings)...
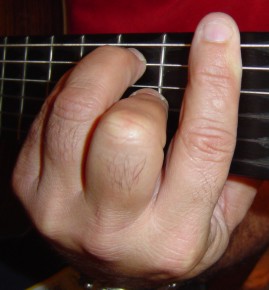 Playing a Full Barre on Classical Guitar
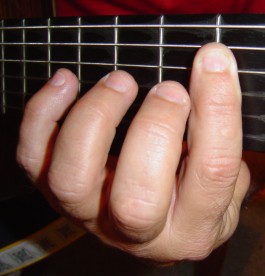 Half Barre on Classical Guitar
Notice my index finger is slightly turned to miss the ridges in my digits, as I explained previously. It's quite an easy thing to do once you get used to it.
Although many "experts" say your finger should be straight, I've never had a problem with it, and I can perform some quite complex and technically difficult music.
I suggest you experiment and make up your own mind. We are all different, with different physical capabilities, but there are A-L-W-A-Y-S exceptions to the rule. So, don't be afraid to flout convention when needed. This is true of most guitar lessons BTW!
As the music gets more complex, the more this chord comes into its own. There are so many guitar chords played in classical guitar music for the beginner classical guitar player that you need excellent guitar technique to deal with them.
Hence this guitar lesson! :)
Sometimes, to get more purchase on a barre chord the "action" is lowered. This just means that the distance from the strings to the fret-board is lowered so the strings are physically closer.
If the action is lower, it often requires less strength and power to hold the chord down and gives you less strain and pain in your forearm muscles, especially if you're a beginner guitar player. Here's what they say about fret action on Wikipedia...
"In the guitar and similar instruments, the term action denotes the distance between the fingerboard and the string, which determines how easy it is to sound notes when pressure is applied with the fingertips.
Generally, a low action is more playable, due to the lower amount of pressure needed to press the string to the fingerboard.
However, if the action is set too low, there is a danger that the vibrating string will strike the frets or fingerboard below it, creating an unwanted buzzing noise (on fretted instruments, this is known as fret buzz).
Conversely, if the action is too high, then the strings may be too taut to fully depress."
You might need to experiment over time to find the optimal position, but most guitars come ‘shop-ready’ anyway, so that’s good news!
Time for the next guitar lesson:
Classical Guitar Lesson Tip #2: Flamenco Rasgueado
The definition of Flamenco and rasqueado is that of…
“A style of instrumental or vocal music originating in southern Spain and intensely rhythmic. Ragueado means "to rake” and is a very fast strumming technique accomplished by using the back of the nails of the right hand."
Like the Barre chord guitar lesson, the flamenco technique of Rasgueado is often a stumbling block for classical guitar players.
Here's how Scott Tennant suggests you should approach the playing of the rasgueado...
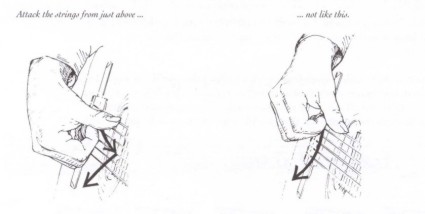 Rasgueado for Classical Guitar
They often think the technique is too difficult but if you break down the technique into steps AND practice slowly at first, you’ll be surprised at how quickly you can master this fun and exciting technique and today I’m going to show you two variations on this skill.
Let’s do this!
Rasgueado Technique #1…
Step 1:
Making sure you have the right angle of your right forearm placed on the upper bout of the guitar (the Sydney Harbour Bridge Method). Then, place your right-hand thumb on the bass ‘E’ string for support and stability.
Step 2:
One by one, drag the back of your fingernails down and over the remaining five strings, starting with the ‘i’ finger, followed by the'm' finger, and then followed by the ‘a’ finger.
Do this VERY slowly at first until you get used to the movement.
Step 3:
When you have got this technique smooth gradually speed up until you have a good speed going.
Step 4:
Reverse the movement and finger order i.e. start on the ‘a’ finger, followed by the ‘m’ finger and then the ‘i’ finger BUT use the inside of the fingernail instead of the outside. It’s just the ‘rim’ of the nail in this case but it still ‘drags’ over the strings quite easily.
Step 5:
Combine the movements of Step 2 & Step 4 so that your fingers are going ‘out and in’, so to speak.
Rasgueado Technique #2…
Step 1:
This time DON’T place your right-hand thumb on the top ‘E’ string. Play through the strings STARTING with the ‘a’ finger this time, followed by the ‘m’ finger and then the ‘i’ finger.
You are still using the BACK of your fingernails to ‘drag’ across the strings but make sure your fingers are not too far away from the strings
Step 2:
Repeat this pattern over slowly 4 times in a row in a beat of 1 2 3 4, 1 2 3 4, 1 2 3 4 etc. Use the metronome again to make is rhythmically correct.
Step 3:
To make it more interesting you can perform Step 2 but using an ‘E’ major chord shape with your left hand for 4 beats and then moving that shape up 1 fret for 4 more beats, then back down to ‘E’ major for 4 more beats.
It’s a great sound!
Remember, repeat the movements slowly at first and as you gain control build up speed gradually. A metronome would be a good idea here because it keeps you in time and the rhythm is always correct.
The Rasgueado is an exciting technique of flamenco that classical guitar players can employ to give their playing more excitement, flair and ‘fire’ but it is a wonderful technique to develop your fine motor skills for your other classical guitar skills.
In other versions the right-hand thumb could also be used, but often in flamenco music it is used to "anchor" the hand so that the fingers can perform the percussive strumming.
It is said that flamenco technique may have developed as an imitation of the way the medieval Arabic 'Ud’ (a form of lute) was played with a wooden plectrum.
Here's a video with some of these techniques for classical guitar, namely: Malaguena...
 Malaguena for Classical Guitar
Go here to see the video and download the sheet music...
Time for the next guitar lesson:
Classical Guitar Lesson Tip #3: Slur Technique
Many guitar players, including classical guitar players, often have trouble playing clean, crisp slurs on their instrument. If you play an electric or steel string acoustic guitar, you might know slurs as ‘hammer-ons and pull-offs’.
No matter what you call them, there is a definite technique you must follow to obtain the perfect sound. Today, I’m going to show you a step-by-step guitar lesson on how to achieve mastery over this often-used and fun technique!
Here’s how:
Step 1:
Start by putting your finger on the ‘F’ note of the 1st ‘E’ string (treble). Also make sure your thumb is directly behind the first finger on the neck of the guitar, so your hand is stable. Raise your 3rd left hand finger about 2 cm above the ‘G’ note 2 frets up the fret-board.
Step 2:
Next strike the string with the ‘i’ finger of the right hand and as you do bring the TIP of your 3rd finger down on the ‘G’ note. DO NOT play the note with your right-hand finger.
The idea is to hammer down on the note, which is produced by the hammering motion.
Step 3:
Keep doing this action for the first 5 frets until you get to the ‘A’ note on the 5th fret of the first string. That is:
Move to ‘F#’ and hammer down on ‘G#’
Move to ‘G’ and hammer down on ‘A’
Move to ‘G#’ and hammer down on ‘A#’
Move to ‘A’ and hammer down on ‘B’ (7th fret)
Step 4:
Now we go in reverse, BUT we start playing pull-offs. With this method put our 3rd finger back on the ‘B’ note on the 7th fret AND our 1st finger is on the ‘A’ note on the 5th fret.
Strike the string using the ‘i’ finger of the right hand BUT here’s where the ‘magic’ begins…
Step 5:
Instead of just ‘bouncing’ off the ‘B’ note you drag the string down towards the floor. This has the effect of making the pull-off sound VERY crisp and clear. You MUST get this correct because you’ll need it for the next guitar lesson, the Trill!
Step 6:
Do this on every fret back down until you return to the ‘F’ note on the first fret again. Rinse and repeat!
When you get comfortable with the slur technique you might want to look at the Slur Study by Carulli, which is an excellent guitar lesson to practice and consolidate your left-hand slur technique.
Carulli was born in Italy in the same year as Beethoven (1770) he became one of the most popular and loved classical guitar composers and players of his time. Indeed, that love extends right up to the present day as new generations of guitarists "find" his music and make it their own.
IMPORTANT: If you want the PDF sheet music of the piece on this page i.e. Slur Study by Carulli and a whole lot more don't forget to subscribe to the LearnClassicalGuitar Resources Newsletter below...
So, there you have it for this classical guitar lesson. Don’t forget, after a while these technical skills become second nature. Indeed – practice makes perfect!
Go here to "Like" and "Comment" on the Slur Study...
Make sure you follow up with the guitar lesson, namely: The Trill, which is basically the hammer-on and pull-off in one continuous movement!
Time for the next guitar lesson:
Classical Guitar Lesson Tip #4: Staccato
Technique
Staccato is best controlled by the right-hand because it gives you much more precision and control over the sound. Staccato is…” Characterised by a performance in which the notes are abruptly disconnected"
The word is an Italian one meaning "detached" or "separated". It is, in effect, the shortening of the duration of a note or notes. It is a very useful guitar technique but often very poorly executed. I've seen many students, especially in beginner guitar lessons, over the years try to play this way with their left hand!
That is, releasing the notes of a chord or melody rather than stopping them with the fingers of the right hand.
As you can imagine, it can make for a very sloppy and careless performance indeed. Practising this guitar technique separate from performance is recommended to ensure the proper sound is produced.
We’re going to practice it the ‘easy way’, via a C major scale.
Here’s how it’s done:
Step 1:
Use the C Major scale on the first 3 frets starting with the ‘C’ note on the 3rd fret of the 5th string and ending with the ‘C’ note on the 1st fret of the 2nd string, an octave in all. Also, use the right-hand fingering of ‘i’ & ‘m’.
When you strike the first note ‘C’ note using the ‘i’ finger the staccato technique is best achieved by putting the ‘m’ finger almost immediately back on the string to mute the note, thus making it short, sharp and clear.
Step 2:
Continue in this manner until you reach the ‘C’ note on the 2nd string. That is, playing and quickly alternating your right-hand fingers to immediately rest on the note and string just played.
Step 3:
Return to the starting position i.e. the 5th string, 3rd fret ‘C’ note. This time though you reverse the fingerings to ‘m’ then ‘i’ on the way down.
Step 4:
Once you’re familiar with the movement and sound of staccato you’ll want to add the use of the metronome. This will help you to stay in time, keep the notes ‘short and sharp’ and be able to increase your speed gradually by turning the metronome up to a faster speed.
Just so you know, this technique is normally indicated in music using a small dot over a note or group of notes. It can also be indicated by a pointed dash (much like an upside-down triangle) and a series of dots and slur lines.
If dots and slur lines are used, it means that the passage to be played is more moderately. Here is a little graphic to show what I mean...
 Staccato on Classical Guitar
If you've ever played the Twenty Studies for Classical Guitar by Sor (arranged by Segovia), I'm sure you would have been tempted to play Study No.9 using this technique.
Although not indicating it in the above-mentioned traditional way, most classical guitarists tend to play it that way because of the 8th note/8th rest nature of the notation.
Playing it even a little more so, can often be a lot of fun, especially at a higher speed (even though it is indicated to be played "Tranquillo"). Try it sometime if you're up to that intermediate level of classical guitar, or any style of guitar for that matter.
It really is a lot of fun...
Time for the next guitar lesson:
Classical Guitar Lesson Tip #5: Vibrato
The definition of Vibrato is… “A tremulous or pulsating effect produced in an instrumental or vocal tone by small and rapid variations in pitch..."
This guitar lesson focuses on the correct technique i.e.(literally "shaking" in Italian) is used as an integral part of classical guitar technique. It is the "swelling" of a note by oscillating a finger which results in a slight variation of the note pitch.
To play vibrato on classical guitar, it is best to use a lateral or sideways motion rather than a vertical or up and down movement.
The sideways movement is much easier to control whereas the vertical movement can be easily subject to too much string bending, making the note sound more like it belongs to Blues guitar than classical guitar.
When I say sideways or lateral movement I mean from the nut to the bridge. The tip of the finger stays in position on the note, and the thumb pinched against the neck behind the finger helps you to "squeeze" more out of the note, minutely altering the pitch.
Here's the deal:
Step 1:
If you’re new to this technique, it’s advisable to start a little further up the fret-board to produce the correct technique and sound.
This seems counter-intuitive at first but you’re not being tested on your knowledge of all the notes on the fret-board, and we start easy for those of you that want to know how to play classical guitar properly.
So first, place your first finger of your left hand on the ‘A’ note of the 1st string at the 5th fret. Play the note with the ‘i’ finger of your right hand.
Keeping the tip of your left-hand finger on that ‘A’ note quite strongly, start to move your hand in a left to right manner so that the note ‘swells’ to create the vibrato.
Step 2:
Shift your little finger of your left hand to the 12th note on the 1st string. It is an ‘E’ note. Use the same technique as on the ‘A’ note i.e. keep your fingertip ‘rooted’ to the note but oscillate your hand from left to right and back again along the fret-board.
Note: You should keep your thumb connected to the neck of the guitar to ensure your hand, and thus the note, stable and secure. You should hear s ‘swelling’ sound of the note, which is indeed, the vibrato.
Step 3:
Try the same movements on the 5th and 12th frets of the ‘B’ 2nd string and the ‘G’ 3rd string. Remember the technique is ALWAYS the same, no matter what string or note you are on.
Most guitar experts like Fred Noad, Anthony Glise and David Braid in their respective guitar instruction books all agree that the student should practice on the strings from 2-6 and from the 5th to 7th fret upwards.
It is much easier to perform in these positions rather than on the first string towards the nut.
Additionally, Vibrato really needs to be used sparingly as its overuse can make your performance somewhat distasteful and garish... Leopold Mozart, writing about the overuse of this technique on violin way back in 1756 said...
"Performers there are who tremble consistently on each note as if they had palsy."
It still holds true today, and you would be well advised to heed the old saying "less is more". Here is a picture from David Braid's excellent book on classical guitar that demonstrates the correct way to perform this technique.
Notice the arrow which depicts the movement of the fingers in a lateral way...
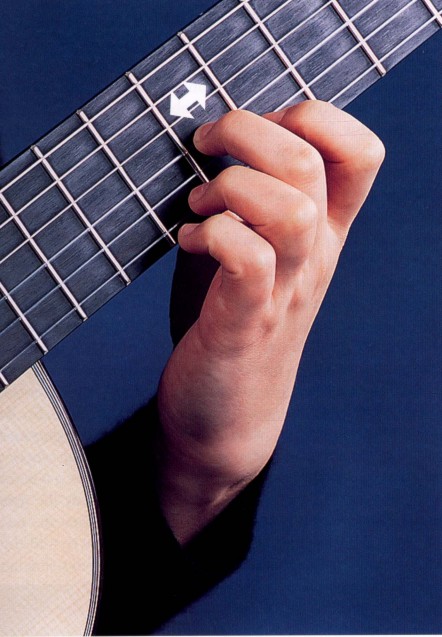 Vibrato on Classical Guitar
Picture courtesy of David Braid's 'Play Classical Guitar'
Time for the next guitar lesson:
Classical Guitar Lesson Tip #6: Damping
The definition of Damping is… “The quieting or abrupt silencing of the strings after they have been sounded..."
Further, Wikipedia describes the technique as...
"On guitar, to damp (also referred to as choking) is a technique where, shortly after playing the strings, the sound is reduced by pressing the right-hand palm against the strings, right hand (including Palm muting), or relaxing the left-hand fingers' pressure on the strings, left hand (or Left-hand muting).”
I don’t like the ‘palm’ method because the ridges and lines on the inside of your hand make it too easy to fluff the technique.
I much prefer to use either the thumb of the right-hand along its side length, or alternately, the other side of your right-hand from the bottom of the hand to the tip of the little finger.
It is not a particularly difficult technique, but you do have to be accurate and perform it with some sensitivity in this guitar lesson.
Here's an example of this in action...
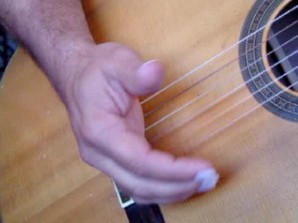 Damping on Classical Guitar
Here are the steps:
Step 1:
I like using an ‘E’ chord in the 1st position for this exercise. After forming the chord play a thumb strum with your right-hand thumb starting at the Bass ‘E’ note across the 6 strings to the Treble ‘E’ string in a deliberate, clear strum.
Step 2:
Using the outside of your right-hand thumb all the way to the bottom of your hand place the skin of this area along all six strings at once.
Because this skin area is quite ‘fleshy’ it should mute all strings at once quickly and clearly without separate notes sounding or any ‘buzz’.
I call it the "heel" of your hand, much like when you play pizzicato. In this method, you place your hand over the strings close to the bridge.
Step 3:
Strum the ‘E’ chord in the same way again but this time use the outside of the hand as per the picture below…
Remember, you don’t need to rush this or do it in a haphazard way. Just perform it evenly and cleanly in a relaxed manner and you’ll get the desired effect.
Step 4:
Repeat the steps again as many times as you feel comfortable. Remember – practice makes perfect!
Like any guitar technique it is a little difficult at first but with a little practice and experience over time, becomes easy.
David Braid, in his excellent guitar resource book Play Classical Guitar has some excellent photos of how to do this with the thumb. I really recommend this book to anyone whether beginner or advanced. It's great.
Now it’s time for the next classical guitar lesson…
Time for the next guitar lesson:
Classical Guitar Lesson Tip #7: Glissando
It is said that… "Glissando is performed with a gliding effect by sliding one or more fingers rapidly over piano keys or strings..."
This technique, sometimes known as portamento or slide, is when you move from one guitar note to another in a piece of music on the same string without lifting your finger entirely off it. It is meant to add expression and should be performed tastefully.
In music notation, it is usually indicated by the word "gliss" and there is usually a small line drawn between notes in the score or sheet music itself.
Classical guitar players (and others) are really performing a slide which is, often, faster and even more graceful than the "gliss" or portamento.
Whatever you want to call it, it shouldn't really matter if the end goal is to add some graceful and tasteful skills to your overall guitar technique in this particular guitar lesson.
Let’s practice the glissando…
Step 1:
Use the notes we used in Vibrato, namely: ‘A’ on the 5th fret of the 1st string to the ‘E’ note on the 12th fret of the first string.
Place your little finger of your left hand on that ‘A’ note. Slide it quite quickly from that ‘A’ to ‘E’. Make the slide very light WITHOUT lifting your finger off the string. Your finger should ‘glide’ over the string.
If you feel the frets as you go by you are doing either of 2 things wrong. Either you’re putting too much pressure on the string OR you are playing too heavily and slowly.
Step 2:
Once you get the feel for glissando you need to make it even faster and lighter until you can perform it at quite a quick tempo. Of course, you need to build up the speed gradually and with a metronome for accuracy in rhythm.
Step 3:
Practice the same technique on strings 2 (‘B’) and 3 (‘G’) also from the 5th to the 12th fret.
This is how Francisco Tarrega used a slide in his mazurka called "Marietta" played by Julian Bream...
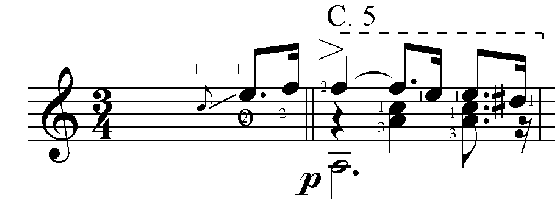 Glissando on the Classical Guitar
https://www.youtube.com/watch?time_continue=9&v=PlRToIdpuyU
Below, in the YouTube video, you can see Julian Bream play Marietta. If you want the full series this performance came from click here...
As you can see, the slide that is used is on the second string. It starts at the "C" note on the first fret and slides to the "E" note on the 5th fret.
It is a good idea to make these "slides" part of your daily practice. You can use different fingers and practice on different strings until you get a good feel for the gliding/sliding motion.
Don’t forget, you need to let off a little pressure from when you are fingering the note but make sure your finger doesn't come off the string or the sliding sound shall be lost.
Again, like everything with guitar, it's going to take some honest practice on your part but believe me, it's worth it in the end...
Time for the next guitar lesson:
Classical Guitar Lesson Tip #8: Guide Fingers
Using guide fingers on guitar means that you use a finger (any appropriate finger) to move from one guitar note to another as smoothly as possible. As the word "guide" suggests, your finger stays in contact with a string or strings when moving from point "a" to point "b".
Of course, you do let the pressure off but not to the extent that it leaves the string. It is also a slide that is NOT heard.
So, using guides is really about the degree of pressure, or a release of pressure. The thumb also stays in contact with the back of the neck of the guitar behind the first or second finger when using guides.
Here’s a great way to practice Guide Fingers guitar lesson:
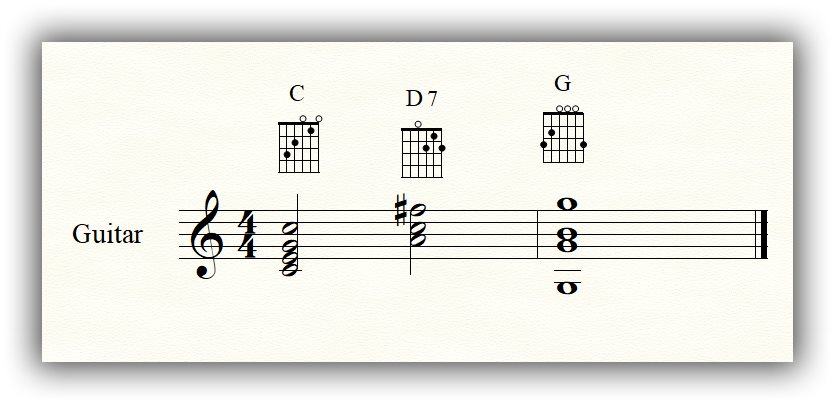 Guide Fingers on Classical Guitar
Step 1:
Put your fingers in the 'C' chord position. Play the chord for 2 beats. KEEPING your 1st finger on the 'C' note on the 2nd string form the notes of the D7 chord while the 1st finger on the 'C' 'guides' them over to their positions...
Step 2:
So, your 2nd finger goes on the 'A' note on the 3rd string and your 3rd finger goes on the F# on the first string. Play the D7 chord for 2 beats and now move to the G chord...
Step 3:
Here's where the 'slide finger' comes into play. Use the 3rd finger to slide from the 'F#' note one fret up to the 'G' note. While your finger is 'sliding' (NOT HEARD) your 2nd finger falls into position up on the 'G' note on the 6th string.
Practice this several times until you get a smooth move from one chord to another.
Of course, you can speed up as you get more adept at changing chords.
At this point, I should mention a close relative of the guide finger, namely, the pivot finger. Pivot fingers are used smoothly to change closely from one place to another. For instance, if you are playing a piece of music that is very "chordal" in nature, you can use pivot fingers to help.
You actually just did this in 'Step 1' above!
Here's another example...
The Twenty Studies of Sor (arranged by Segovia). If you're familiar with Study No.1 in that book, you'll know what I mean about using pivot fingers. Here is a little graphic of the music...
 Pivot Fingers on Classical Guitar
You can see in the penultimate bar that your 4th finger holds the "F" note whilst you get your 1st and 3rd fingers into position to play both the "C" notes. The pivot fingers help you to leverage your other fingers into position and make for a smooth, noise-free change.
As with all other lessons on this site, my best advice is to practice very slowly and regularly. Good guitar technique demands it! It always pays handsome dividends...
Time for the next guitar lesson:
Classical Guitar Lesson Tip #9: Pizzicato
Pizzicato means…
“A light plucking staccato sound sometimes referred to as Pinched ..."
This guitar lesson uses a technique, as the headline suggests, that is performed on the guitar by using the thumb ("pulgar" in Spanish) to pluck the string. This is done whilst having the side (or "heel") of the hand that is doing the plucking resting on the string close the bridge of the guitar.
The whole effect is to try to mimic the sound on bowed instruments such as the violin and the thumb is used throughout, even on the treble strings of the guitar.
The effect is a good clear pitch yet with a damped sound that has a resonant, even comical sound.
On bowed instruments, players tend to pluck the string with their index fingers (as instructed by Leopold Mozart and continued to this day), whereas guitar players will use the palm of their right hand to mute the strings near the bridge of the guitar.
Here’s how to practice Pizzicato…
Step 1:
We’re going to play all 6 strings to test if we have our palm-heel situated perfectly.
Place the heel of your palm on the strings right near the bridge. Make sure your palm heel covers all six strings.
One by one pluck each string from the Bass ‘E’ to the Treble ‘E’ making sure the sound is clear on each string. Here’s how it should look…
Step 2:
Play through the simple single note version of Ode to Joy by Beethoven. If you can’t read music notation then there is a TAB version also…
Step 3:
Check your version against the video I provided. Keep practising slowly until you can get the sound right.
It is thought that this technique was first used by the Renaissance/Baroque composer, Claudio Monteverdi in his work " The Combat of Tancredi and Clorinda", circa 1638.
Here is how this technique is directed in music notation...
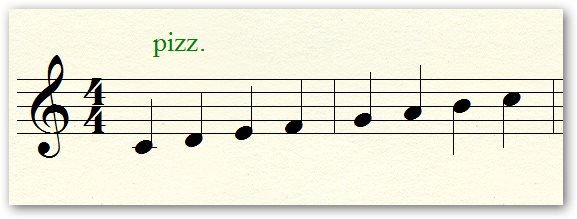 Pizzicato on Classical Guitar
David Braid, writing in Play Classical Guitar, says of Pizzicato...
"Experiment to find the best hand position: if the note sounds too much like a dull thud with little pitch, the hand is too far to the left. Alternatively, if the string is still ringing for a length of time, and the sound is like the usual tone, the hand is too far to the right..."
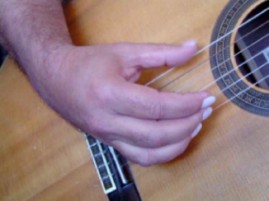 Pizzicato Playing on the Classical Guitar
Sometimes you just must move the heel of your hand around a little to get the perfect position but with a little practice and experience it's not that hard...
Time for the next guitar lesson:
Classical Guitar Lesson Tip #10: Playing
Harmonics
In this guitar lesson, I’m going to show you how to play both natural and artificial harmonics on Classical Guitar.
The natural ones are played on the open strings of the guitar and are particularly clear at the 5th, 7th, 9th and 12th frets.
To play a "natural", you need to place your finger on the string directly above the fret, rather than just before it as you do when you are fingering a note.
Next you pluck the string with your right hand. Then you remove your left-hand finger from the string. You'll get a clearer tone if you pluck the string closer to the bridge.
Artificial types are performed with the left finger on a note as normal. The right hand "i" finger touches the string at the point where the note is produced, and the "a" finger (usually) of the right hands plucks the string.
This is more difficult than playing open string ones…
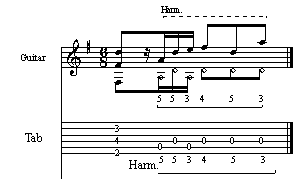 Harmonics on the Classical Guitar
This graphic shows you how you play them properly from Play Classical Guitar by David Braid...
 Harmonics Example on Classical Guitar
Let’s try it:
Do this for open string harmonic practice…
Step 1:
Place your third finger of your left hand directly over the 12th frets of strings G, B, and E. It is important in open string harmonics that you put your finger directly over the fret and NOT where you’d normally play a note i.e. just to the left of the fret
Step 2:
You can use the right fingerings of p, i, m to play the strings one after another. Start slowly and play one after another. You can speed up to a ‘roll’ (quick succession of notes) once you have established a clear ‘bell-like’ tone
Step 3:
Try the same movements on the same strings but use fret 7, then move on to do fret 5.
Step 4:
Play those three harmonic notes in a chord fashion repeated on the 12th, then 7th and then 5th frets. Move backwards and forwards, trying to keep a good, clear sound.
Now for those ‘pesky’ artificial harmonics…
Check it out:
Step 1:
We’re going to play the notes c, D, E (open), F and G. We play these in the first position on the 2nd and first strings with our LEFT hand as ‘normal notes.
Step 2:
Now we play/pluck the notes, BUT we do that 12 frets further up the fret-board. This is where the note repeats itself.
The technique here is a little tricky because you must place the ‘PAD’ (not the tip) of your 1st finger of your right-hand this time over the note and pluck the string simultaneously with your 3rd finger.
Step 3:
After you establish a good clear, bell-like sound start to play that little 5 note scale backwards and forwards i.e. C, D, E, F, G, F, E, D, C repeating.
There is only 1 natural harmonic in this practice scale which can’t be avoided but it does not make it any harder to play.
The notes for the right-hand plucking technique are on these frets in order:
2nd String – ‘C’ note 13th fret, ‘D’ note 15th fret
1st String – ‘E’ note 12th fret, ‘F’ note 13th fret, ‘G’ note 15th fret
For more practice here's a little Carcassi piece called "Galop", which employs the use of this great technique on the open strings...
Go here to "Like" and "Comment" on video...
As mentioned above, because the left hand is fingering a note on the fretboard, the right hand must both play the note with the index finger and pluck the string with the annular, or "a" finger.
It is an aesthetically pleasing additional technique for guitarists, which really adds to the charm of our instrument.
They give a beautiful bell-like sound when played properly. There is a large amount of music for classical guitar that uses these techniques, so it is worth learning them properly.
Now for one of THE most important classical guitar lessons in this series...
Time for the next guitar lesson:
Classical Guitar Lesson Tip #11: Guitar Hand Position
Guitar hand position, according to Scott Tennant, writing in Pumping Nylon, states that the right-hand position is one of the 7 most important ingredients to achieving the best tone production possible.
I must say, I agree wholeheartedly in the interests of this guitar lesson!
Indeed, your guitar hand position for the right hand is probably the MOST important in terms of achieving the correct tone quality. For me, everything follows on from there.
You can see from the photos below in David Braid's excellent book, "Play Classical Guitar", that guitar hand position is all important to achieving correct tone via correct technique...
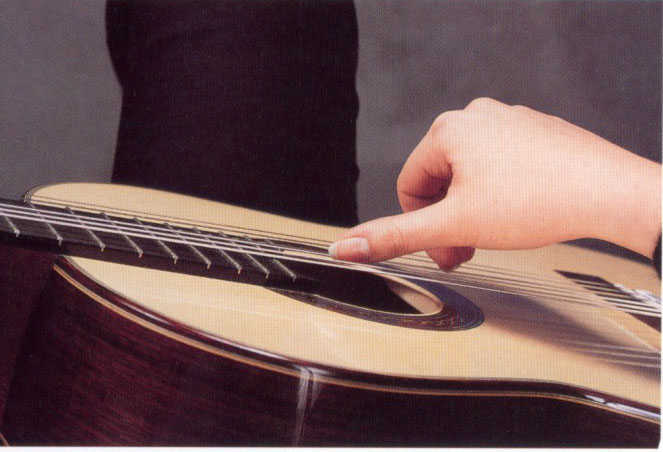 Guitar Hand Position on Classical Guitar
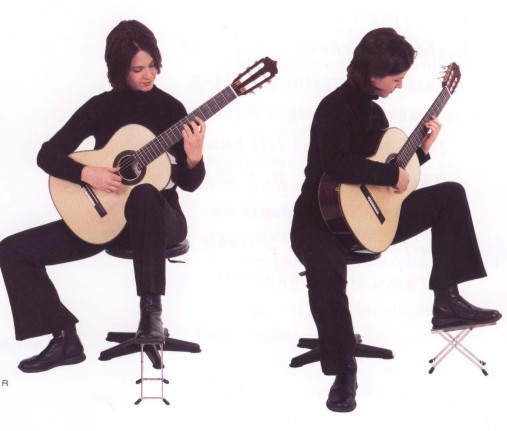 Guitar Hands Position on Classical Guitar
As you can see, your thumb and fingers have to stay out of the' way of each other and have a contrary motion.
That is, the fingers come up while the thumb goes down without hitting each other, but at the same time, all fingers and the thumb also move towards your tummy.
A great exercise to make you depress the strings before you play them and ensure you don't pluck the strings outward too excessively is to place them on the strings and give a long, slow squeeze.
If you master this movement, you'll find that your tone quality, volume, and playing in general should improve dramatically.
Here’s how it works:
Step 1:
Place your right hand on the upper bout of the guitar in line with the bridge (where the strings are anchored). Next, make sure your arm is placed on the ridge of the bout about 3–5 cm from your elbow joint for maximum comfort.
Step 2:
Bring your hand and fingers down toward the strings so that your thumb is in line with the middle of the sound hole and your knuckles are basically aligned with the strings.
Place your thumb on the bass ‘E’ string, ‘i’ finger on the ‘G’ string,'m' finger on the ‘B’ string, and ‘a’ finger on the treble ‘E’ string.
If you look down at your fingers, you should see a ‘cross’ or ‘X’ between your thumb and first finger. This means your fingers won't get in the way of each other when you start to play.
Step 3:
Squeeze the strings both towards each other and towards your tummy or the back of the guitar simultaneously. That means your thumb is going down and in, and the G, B, and E strings are coming up towards the thumb and also slightly in towards your tummy.
Step 4:
Release the strings as an open chord. Repeat as necessary to achieve a nice, clear sound. Make sure you maintain this position of your hand throughout. Don’t let your wrist or fingers drop to a new position.
You really need for this to become second nature. Have a look at my other page on classical guitar technique, where I discuss other fundamental and foundational techniques you need to master before moving onto other, more difficult techniques.
Time for the next guitar lesson:
Classical Guitar Lesson Tip #12: Shaping Your
Nails for Guitar
Shaping your fingernails in the correct fashion is an important guitar lesson in the world of classical guitar.
It is said that the playing of the guitar with nails began
somewhere around the time of Aguado and most probably originated with him.
Indeed, it was an exciting time in the development of Western music when many new conventions, such as the use of the metronome, became more widespread.
Sooner or later, if you play classical guitar and want to have decent volume and good tone, you're going to have to use the nails of your right hand to pluck and play the strings.
Sharon Isbin writing in her excellent Classical Guitar Answer Book said...
"Classical guitarists can play without nails, but they should be aware that in doing so, they are sacrificing certain possibilities of tone color and projection—all of which affect interpretation and musical presentation."
How do you go about shaping your nails for the most effective sound?
Follow these steps:
Step 1:
When shaping your nails, it mostly depends on what you feel comfortable with. The most common methods are shaping your nails to follow the shape of the fingers themselves.
So, clip your nails following the contour of your own fingers.
A good length to aim for is when you hold the tips of your fingers up to eye level, palm in.
You want to be able to see approximately 2-3 millimetres above the contour of each fingers.
Some people like them much longer, but I am talking about the optimal level for the majority.
Sometimes, if your nails are too long they may get caught on the strings, especially at high speed. Best to start small and adjust over time if needed.
Step 2:
Once you have the right length you need to make them smooth. What works best here is some rough sandpaper for the initial file and very finely graded sandpaper to make your nails smooth.
You might even buy a nail-file.
You can often buy them with a false nail kit. They have both rough and smooth sides to them for your nails.
Step 3:
After you’ve sandpapered your nails with the rough to get the right shape and size, use the smooth sandpaper to make the nails sound good when contacting the strings.
Don’t forget to sandpaper the inside edge of your nails because that part is the first to contact the strings.
Remove any burrs or rough edges and you should be good to go!
Like many topics in classical guitar there is always conjecture, debate, disagreement and differing opinion and shaping nails is no different.
This is healthy and will ensure that classical guitar stays vibrant and relevant as we move further into this new century.
There is always a core of knowledge from which our standard practices spring.
Core knowledge that has stood the test of time over many centuries.
If you follow the basic tenets of what I've told you, you won't go far wrong.
If you need to adjust suit your physical shape or mental approach, then don't be afraid to do so.
Here’s an example:
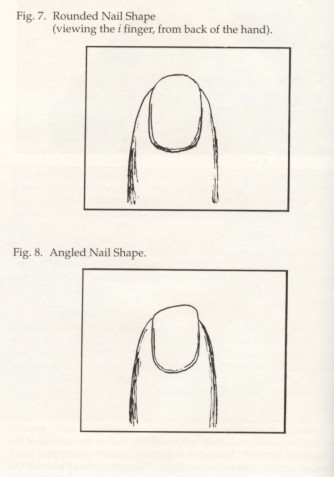 Shaping Your Nails for Classical Guitar
Picture courtesy of Classical Guitar Pedagogy
This is a
little diagram of nail shaping from one of my favorite classical guitar books. You
can see in the top picture that the nail follows the natural curve of the
finger.
If you turned the finger around so that the nail is pointing away from you, you would see that the nail length is just a few millimetres above the finger itself.
In other words, if you hold your finger at eye-height as I said in the steps above, you should just see the fingernail protruding above the flesh.
If you have it much longer than this, it tends to catch on the strings and can be very awkward.
If you have it much shorter than this, you tend to miss the string itself when playing.
The other angled method as seen in the lower diagram is used to produce a "very dark, warm sound" according to Mr Glise.
I can attest to this as I have shaped my nails like this on many an occasion. I often tend to reverse that angle as well, making the protruding part on the left of the nail rather than the right-hand side.
It just seems to make me feel more comfortable as I feel I can get a good "grip" on the strings.
Whether you use either of these methods when shaping your nails is based on personal decisions of finger shape, nail arch etc.
Something that everyone can do to help their sound, however, is to use a very fine sandpaper to smooth off the nail, particularly the inside edge.
Left raw, the nail can produce a very scratchy, uneven tone which is what you don’t want.
Also, an un-papered nail could have uneven edges that slightly protrude, catching the string and causing some of those notes we all know as "clangers".
Having done all this you still must realise that it's not only the nail that plays the string.
If you ever listen to Segovia (and who hasn't?), you'll notice that his very warm tone comes from a mixture of playing the strings with the flesh and the nail. He really perfected this technique.
Oh yes! You're right!
Hours and hours of practice too:)) Here's how Anthony Glise explains the technique in his book...
"Using nails is somewhat confusing to beginners since they often assume that only the nail is used to sound the string. In fact, only the nail releases the string.
When correctly placed on the string (at the exact point from which the finger will play), both the nail and the pad of the flesh at the fingertip will touch the string at the same moment - the pad will stop the string (much like the damper pad on a piano), and the nail will be simultaneously positioned to re-strike the string."
Don't worry if this sounds too hard or confusing if you're a beginner.
With slow and concentrated practice this technique becomes ingrained in your playing.
After a while, it’s like anything you do - second nature. Just like shaping your nails:))
I hope, this little discussion has made the topic of shaping your nails a little clearer...
Time for the next guitar lesson:
Classical Guitar Lesson Tip #13: D-Drop Tuning
To learn this D-Drop tuning guitar lesson technique aka D Open tuning, is very simple indeed. It is one of my favorite alternate guitar tuning methods.
Indeed, it may have originated with the classical guitar but is used in all types of guitars and guitar styles, such as blues, jazz and even hard rock and heavy metal.
The sound produced, for example, in Tango by Albeniz', just sort of "hits you in the chest" as the rich sound of the lower d note, and the resultant overtones produce a wonderful warm feeling throughout your body
(I hope it's not just me :))
How is this technique achieved on classical guitar? EASY!
Follow these steps:
Step 1:
Make sure the guitar is in tune (normal tuning) before you start. Re-tune the Bass ‘E’ string down so that it is tuned to a "d" one octave below the open d 4th string, rather than the usual "e" as in standard tuning.
Yes, this is also a tone below the normal "e" 6th string note. It is a great sound and adds a real purity of depth to the music.
Step 2:
Next, I adjust all the other strings, starting at the top or 1st ‘E’ treble string and make sure all the strings are in tune as D Drop has a slightly different feel or effect on the guitar.
You need to re-tune to make sure all the strings are "sympathetic' to the new tuning.
It's funny how, when you change the tuning, all the other strings seem to have a different "feel" to them. You must be attuned to that different feel, no pun intended! :)
I'm not sure why this is so, or even if I can prove it logically, but I have learnt (felt) it over many years of tuning my instruments.
Step 3:
Go over the tuning once more to make sure that the strings have ‘held’ their position. It is a good idea now to check with an electronic tuner if you have one to be doubly sure.
After playing you might have to re-check to see if the re-tuning has held.
It is a simple but often-used tuning when playing classical guitar, especially when you get to the intermediate to advanced levels.
D-Drop Tuning
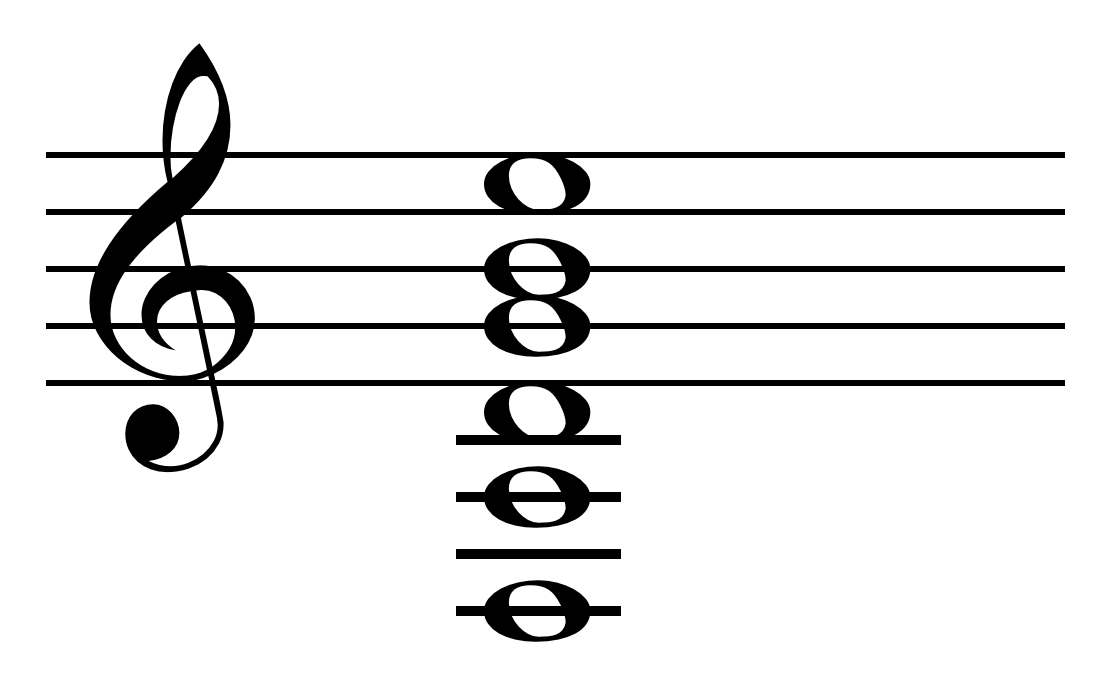 D-Drop Tuning for Classical Guitar
Time for the next guitar lesson:
Classical Guitar Lesson Tip #14: How to Read
Guitar Tablature
Many classical guitarists ask,“How do you read and play guitar tablature?”
I say EASY!
Here’s how it works:
Tab is a way of reading guitar notes, chords, and music using a six-lined staff.
It looks like the music staff that is used in music notation but is, in fact, a graphic representation of the six strings of a guitar. For example, here are the open string notes in both music notation and tablature.
For example, here are the open string notes in both music notation and guitar tablature...
 Tablature for Classical Guitar
You can see that the staff line and ledger lines above have notes written on them that tell you which note to play. The time signature of 6/8 also tells you that it is six beats per bar and that they are eighth notes...
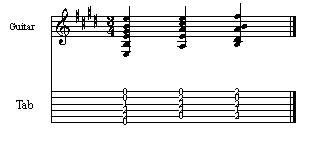 Tablature for Classical Guitar Chords
Here's how the preceding E chord would look as an arpeggio (notes played in succession or spread out one after another) in both notation and tablature...
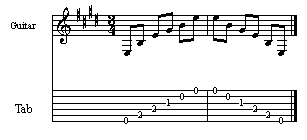 Arpeggio Tablature for Classical Guitar
You may have noticed the different numbers in the tab section of the two preceding examples. This is the rub!
The numbers in tablature are the FRETS where the note is played or stopped with your left-hand fingers, or an "O" for an open string note.
In other words, the E major chord above consists of these notes: Open E bass or sixth string; B note played on 5th string, 2nd fret; E note played on 4th string, 2nd fret;G# note played on 3rd string 1st fret; open B treble string, and open E treble or first string.
Even though, it is a very popular, enjoyable and relatively easy way of reading guitar music, tablature does have its shortcomings.
Indeed, Ralph Denyer in his excellent publication, The Guitar Handbook, says...
"The system relies on you being able to hear the piece of music so that you are familiar with the rhythmic structure and the timing of the individual notes, guitar tablature cannot convey precise information about timing and the duration of notes. Nor does it help you to understand the harmonic structure of a piece in the way notation can."
His point is that tablature is no more than a form of musical shorthand. That aside, I think guitar tablature is very worthwhile as a useful and fun tool and acts as another "string to your musical bow" as it were.
There are some great publications with excellent music that have both traditional notation and guitar tablature on the same page and are very worthwhile to have in your own personal library.
But back to tablature. Here are some more very popular guitar tablature conventions that are in use throughout the world today...
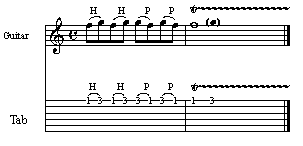 Guitar Tablature Conventions
In the first bar, you have the common Hammer (H) and Pull-off (P), common to both notation and tablature, although they are also known as "slurs" in regular notation.
In this case, the technique required is to hold the F note down on the 1st string, 1st fret, with your 1st finger of the left hand and "throw" your 3rd finger of the left hand at the G note on the 1st string, 3rd fret.
It has quite a weighty feel to it, although you should maintain balance, grace and accuracy. The same balance, grace and accuracy need to be maintained for the pull-off (though the technique is obviously quite different).
You should have both the 1st finger on the F note and the 3rd finger on the G note at the same time.
When you play the G note, your 3rd finger drags the string downwards towards the floor while the F note is maintained in position.
When you do this, it gives the pull-off a very crisp snapping sound, free of buzzes or other extraneous string noise. It both sounds and FEELS good when you do it well!
In the second bar, after the hammer and pull-off, is an example of the "Trill". This is, in fact, just a hammer and pull-off in continuous motion for a long-trilled note lasts. (Notice for both notation and tablature that the trilling sign is the same e.g. "tr" followed by a squiggly line).
It usually starts with the lower note rapidly alternating with a note a semitone or tone above it. In our case above it is an "F" note to a "G" note on the 1st string, 1st fret to 3rd fret.
Your 3rd finger should still maintain a downward motion after playing the G note even though you could be "trilling" quite fast. It helps if you don't let your finger go any further downward than approximately the distance between strings.
This again produces a crisp, snapping effect that sounds professional and classy rather than loose and lazy.
Remember...Practice (Slow practice gradually getting faster) makes perfect! Our next example is the Tremolo. The tremolo can be a difficult technique to master.
As I just mentioned above, slow practice, (gradually getting faster) is really needed in this instance.
Both Scott Tennant in his book... Pumping Nylon and Frederick Noad in his book "Solo Guitar Playing", agree that the proper playing and execution of the tremolo technique is difficult but worth it in the end.
Indeed, Scott Tennant says...
"Difficult and frustrating it may be, but I believe we are fortunate as guitarists to call it our own...the key to success in playing good tremolo is not speed, as most students believe, but evenness of articulation. When a note is played accurately, the faster the tremolo will seem."
And from Fred Noad on tremolo technique...
"It seems strange that slow practice should help in the attainment of greater speed, but the fact has been stated and restated by musicians and teachers.
What seems to happen is that a very positive and accurate habit is formed, so that there is no vagueness or uncertainty when the movement is played at a faster speed"
Now to how the tremolo is written in both notation and tablature. Our first example is the most common way of writing the notation, and in this instance, we are using 32nd notes (three tails on the stem)...
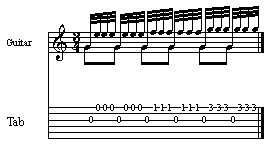 Tremolo for Classical Guitar
Another traditional way of depicting tremolo both in notation and tablature is this...
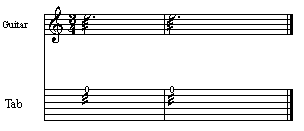 Another Traditional Way of Tremolo on Classical Guitar
It is really a shorthand way of depicting tremolo in both notation and guitar tablature to save room within the bar. This way, the music also won't look "busy" or perhaps threatening!
Our next convention in guitar tablature and notation is the slide. It is a way of moving gracefully from one note to another (both up or down a string), even though it is usually stronger than the portamento. The portamento, according to any good dictionary of music, is...
An effect obtained by carrying the sound in a continuous glide from one note to the next.
According to Fred Noad in Solo Guitar Playing, the slide is more...
Marked in the music, it is employed where a more extreme effect is required, usually covering a wide interval of notes.
Here's what the slide looks like in both notation and guitar tablature up and down the string...
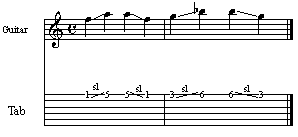 Slide for Classical Guitar
Two more of our guitar tablature conventions are those of the vibrato and the harmonic. Although in notation vibrato is rarely indicated, in guitar tablature the following sign can be used...
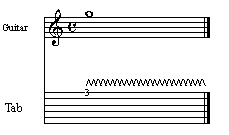 Vibrato and Harmonics in Tablature
The harmonic can be displayed several ways e.g.
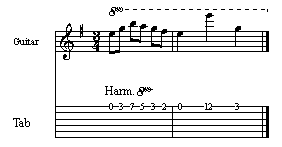 The harmonic can be displayed several ways
Or, another way in guitar music is the use of diamond shaped note heads in the notation, though you don't use them in guitar tablature...
 Diamond Shaped Harmonics on Classical Guitar
Time for the next guitar lesson:
Classical Guitar Lesson Tip #15: How to Play a Trill on Guitar
What is a trill? It’s been described as…
“The rapid alternation of two tones either a whole or a half tone apart..."
So, what Makes a Good Trill on Guitar?
There are several elements in this guitar lesson that assist good technique for this type of movement on classical guitar, or any style of guitar for that matter. Because it is made up of smaller movements, we should first examine what those movements are.
The complete technique on guitar consists of ligado or slur movements both up and down.
If you are an electric guitar player these movements would simply be known as hammer-on and pull-off so don't be bothered by the term.
Let’s get started:
Step 1:
Firstly, we'll start with the upper ligado or hammer-on…
This just means the slur is being played from a lower pitched note to a higher pitched one. Here is an example of how slurs are written from "F" to "G" on the 1st or "E" string of the guitar...
 Upper Ligado or Hammer-on on Classical Guitar
The way you play it is to hold "F" with your first finger and play it as normal with your right hand. Then snap your 3rd finger down quite firmly on the "G" note without striking the string again with your right hand.
You should use the very tip of your 3rd finger to execute this movement, as using the "pads" can often lead to unwanted muting or string noises.
Step 2:
The lower ligado or pull-off starts with your 3rd finger on the "G" note, and as you play the note, you pull your 3rd finger in a downward movement towards the floor, dragging the string with it (slightly; don't overdo it). Next, the "F" is sounded.
This has the effect of making the ligado tone very crisp and snappy, which is what you're aiming for. It's the reverse of the upper ligado...
 Lower Ligado or Pull-off on Classical Guitar
Once you have mastered these movements (very slowly, of course!) you can join them up to complete this technique.
Step 3:
A trill is nothing more than these two movements (above) joined together in a continuous movement for, however long it is indicated. It is often quite faster than a normal ligado.
In music notation, it is indicated as "tr" (and a squiggly line) and looks like this...
 Trill on Classical Guitar
When you perform the ligado don't forget that the only note that is struck with the right hand is the first one, unless the music indicates otherwise.
The sounding of the succeeding notes is from the left hand in a trilling motion. You can see that there must be a firm technique involved otherwise it will sound shallow and weak and trail off. You'll need to build strength in your hands and fingers over time.
It all comes with practice and patience so don't be put off. Practice these guitar lessons slowly and regularly and you too will get it perfect.
Recent New Pages:
What is Classical Guitar Playing?
Arpeggio Beginner Guitar Lesson Classical-Fingerstyle Portal
Blog Technique Free Guitar Lesson
Guitar History Guitar Instruction Guitar Lessons
Guitar Time Line Malaguena Memorizing Music
Music Notation Music Notation Primer Sight Reading
Sight Reading Guide Theory Work Sheets Renaissance Guitar
About Contact Privacy Policy Site Map Site Search
